
The last post was about installing Nextcloud on the DiskStation. After the installation, however, some adjustments should be made so that Nextcloud runs optimally and to increase security. In addition, depending on the environment, some error messages may appear. And that’s exactly what this post is about.
Version hint
With the release of a new version of Nextcloud or DSM, optimization steps can be omitted or new ones can be added. The optimization steps in this article apply from Nextcloud 18.0 and DSM 6.2.2. If you are using an older version or receive optimization tips from Nextcloud that you cannot find here, the previous version of this article may help you.
Updates
– April 21: Nextcloud 21 security and setup warnings added
– November 20: Nextcloud 20 optimizations added- Big Int conversion and missing primary keys
PHP 7.4
Synology updated their PHP 7.4 package and added the support for zip module. The new version is already available on Synology’s home page and should be soon also available via update in the Package Center. Now Nextcloud can be finally updated to use PHP 7.4.
Preperation
Nextcloud is installed and running on the DiskStation. You can read here how to install Nextcloud on a DiskStation.
Optimization and troubleshooting
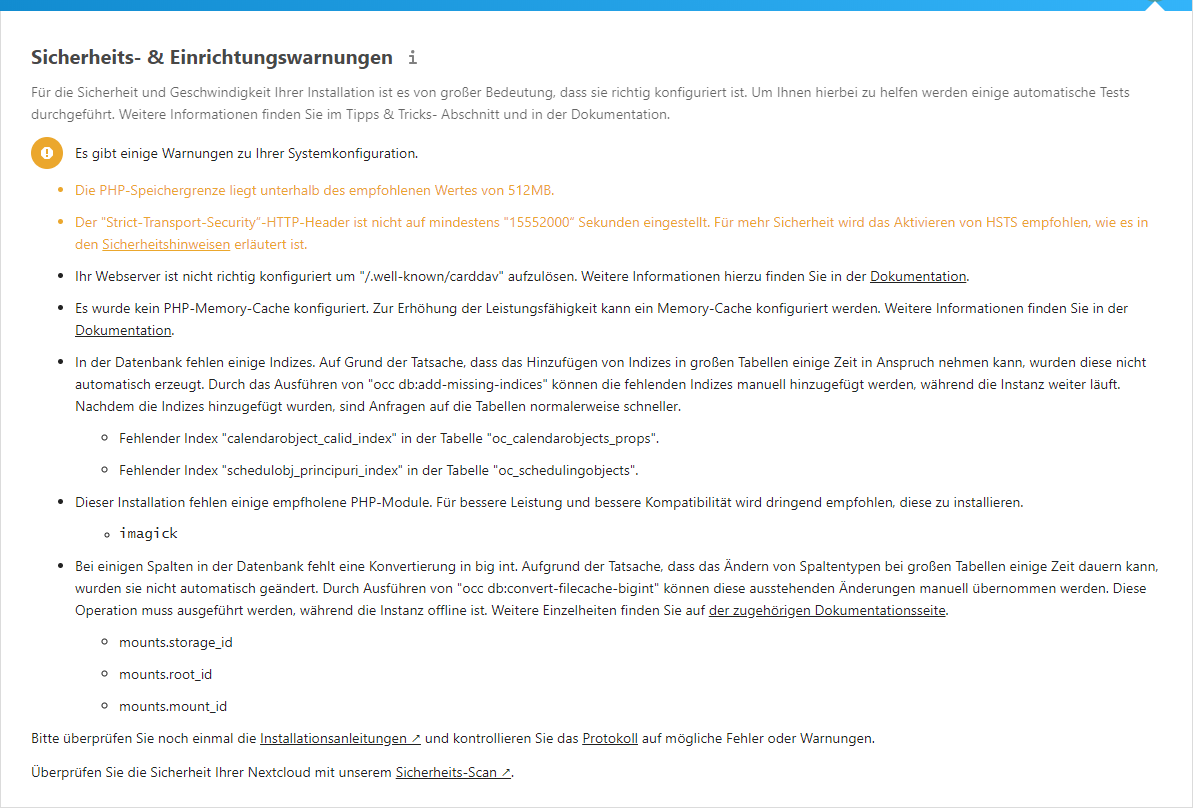
After the installation, some adjustments to the settings are necessary. Some of them are even suggested to you by your Nextcloud. You can find these error and notification messages in the menu under Settings > Overview > Security and setup warnings. Since the DiskStation does not always behave like a normal Linux server, it is important to find out where the configuration changes can be effectively made and what additional steps are required.
Beware the path
Make sure to adjust any path information if your /web directory is on a different volume than the one specified here or the installation directory is not called “Nextcloud”.
Important
Always make changes to the files mentioned here via the command line as root (sudo -i) and never via the DiskStation’s text editor. In contrast to the command line, the text editor changes the owner and permissions.
Database update
The exact wording of the message depends on which version of Nextcloud you have installed. The solution is always the same. You have to make changes to the database via the command line. You will most likely get a similar message after every update from Nextcloud. This is because these changes to existing databases can take some time and must always be done via the command line. Therefore they are not part of the installation or update routine, which can also be called via the browser.
You make the changes with the occ commands (Nextcloud’s command set for the command line). You can read the necessary commands directly in the message. The hurdle here is just getting this right on your DiskStation.
Open PuTTY and connect to your DiskStation. The command line of your NAS does not know the occ commands, so you have to switch to your Nextcloud directory, where the occ commands are defined.
cd /volume1/web/Nextcloud
So that you can use the occ commands, you still need the correct user (sudo -u http), the correct PHP version (php74) and you should also increase the memory limit (-d memory_limit = 1024M), since the default value is too low.
The correct PHP version
The occ commands are based on PHP scripts, so that you can execute them on the command line, you need the correct PHP version. This has nothing to do with the version on the web server and can differ from it. Synology still uses PHP 5.6 for the command line (even if you haven’t installed the package, as we said we are here on the command line and not on the web server). In order to be able to execute the commands, at least PHP 7.0 is required. So use phpXX for the correct call, where XX stands for the version number that you also use for the web server.
Missing indices
Now it is time to add the missing indices, use the following command:
sudo -u http php74 -d memory_limit=1024M occ db:add-missing-indices
Big Int conversion
Message in Nextcloud:
“Some columns in the database can be converted to big int. Changing column types can take some time for large tables. Therefore, the conversion must be started manually with the command” occ db:convert-filecache-bigint “. To convert the Instance has to be offline. Details on the associated documentation page. “
Afterwards you will see a list of columns that are affected. Which these are depends on which version you have installed or which version you have upgraded to. The command to convert the columns is again in the information text, so that you can execute it on the command line of your DiskStation you have to adapt the command a little:
sudo -u http php74 -d memory_limit=1024M occ db:convert-filecache-bigint
Missing columns
It can also happen that the database gets expanded through an update, which must also be done later. The message then points out missing columns in the database. The command for this is:
sudo -u http php74 -d memory_limit=1024M occ db:add-missing-columns
Missing primary keys
Message in Nextcloud:
“The database is missing some primary keys. Due to the fact that adding primary keys to large tables could take some time, they were not added automatically. By running” occ db: add-missing-primary-keys “, these missing primary keys can be added manually while the instance continues to run. “
Followed by a list of affected tables. Which they are, is version dependent again. The occ command is again in the text and only needs to be adapted for the command line:
sudo -u http php74 -d memory_limit=1024M occ db:add-missing-primary-keys
Repeat the process for every occ command you can find in Nextcloud’s security and setup warnings.
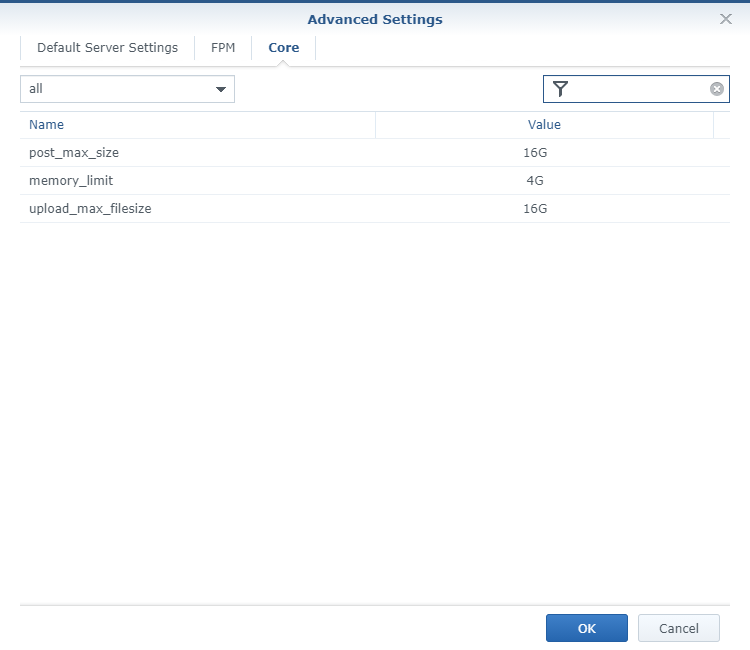
Tweak PHP variables
So that larger files can also be uploaded via the web interface, some PHP variables must be adjusted. The RAM available for Nextcloud should also be increased. To do this, open the Web Station > PHP Settings in DSM and edit the PHP profile that your Nextcloud uses (a virtual host and your own PHP profile for Nextcloud make sense). In the Core tab, look for the memory_limit variable and assign at least 512 MB (as the value 512M). Of course, more is better, but it also depends on how much RAM your DiskStation has and whether other processes are running on your NAS (which of course also need RAM). Incidentally, 2 GB (2G as value) is recommended for OnlyOffice.
Now look for the variables post_max_size and upload_max_filesize and enter a high value there (e.g. 16G). This is not about memory, but about the file size that you can upload at once. Google will tell you the difference between the two variables, but in most cases the same value is sufficient for both variables. The web interface is rarely used for uploading large amounts of data anyway.
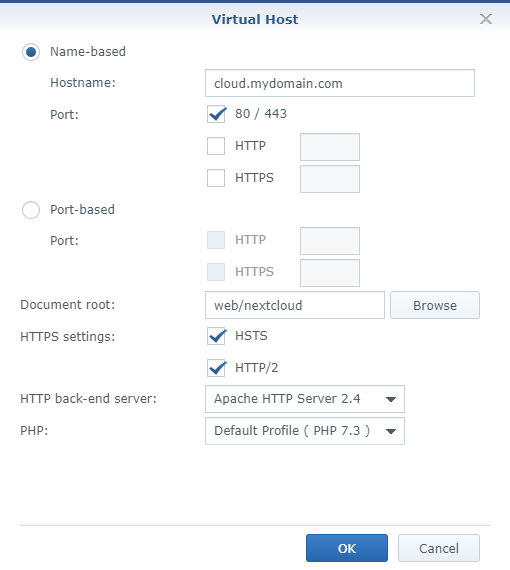
Activating HSTS/http forward
If you used my instructions for the installation and followed my recommendation to set up your own virtual host for Nextcloud, you shouldn’t even get this message. If you still get it, check whether you have activated HSTS and HTTP/2. If you haven’t created a virtual host, you can create one now. To do this, select virtual host in the Web Station and create a new entry.
- Enter the host name under which you want to reach your Nextcloud. (The host name must exist and point to your DiskStation, more on this in this article.)
- Selects the ports to which the virtual host applies (usually 80/443).
- Select the Nextcloud folder (
/web/Nextcloud) as the document root. - Be sure to activate HSTS and HTTP/2, this ensures that all http accesses to your cloud are redirected to https.
- Select Apache 2.4 as web server and the previously created PHP profile.
If you don’t want to or can’t use a virtual host, you can activate HSTS globally on your web server. In PuTTY as root, create the file /etc/nginx/conf.d/http.hsts.conf and insert the following line:
add_header Strict-Transport-Security "max-age=15768000; includeSubDomains; preload;";
Important
Always create new files via the command line. Never create these on your computer and then upload them. In most cases, the coding of the text file does not match and the script cannot be executed or the configuration cannot be read.
Saves and closes the file and then restarts Nginx (synoservice -restart nginx).
Proxy
Why configure Nginx when Nextcloud is running on Apache? Nginx precedes Synology NAS devices as a proxy. Even if you use Apache as web server, all requests will always go through Nginx, so activating HSTS is sufficient here.
Activating PHP memory cache
The memory cache improves the performance of your cloud. If you have followed my installation instructions, you have already activated it and only need to enter it in the Nextcloud configuration. If you have not activated the cache, you can do so by ticking the “Activate PHP cache” box in the PHP profile.
To enter the cache in the Nextcloud configuration, open the file /web/Nextcloud/Config/config.php with PuTTy and add the following line at the end of the file (before the closing brackets):
'memcache.local' => '\\OC\\Memcache\\APCu',
Attention
Rather type in entries by hand than copy them from websites. If you insert single or double quotation marks in the text editor of the command line, it can happen that these characters are not correctly encoded and are not recognized as such. The configuration is then not loaded.
Save and close the file.
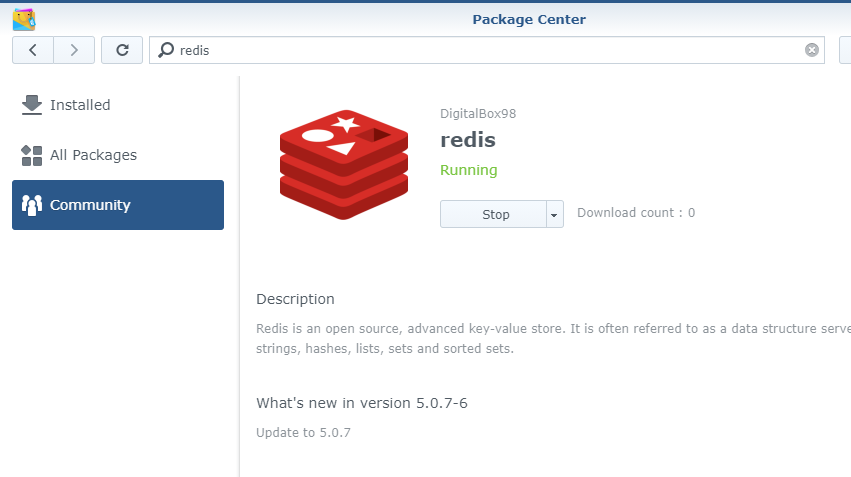
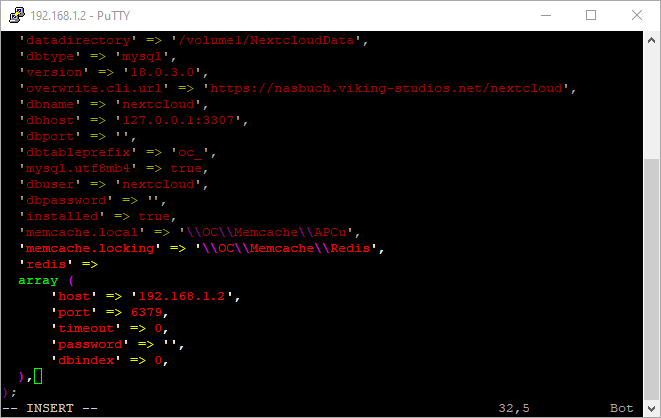
Activate Redis
Redis improves file locking. To use Redis, you have to install the “Redis” package on your DiskStation. You can find it in the community repository. If Redis is installed and running, open the file /web/Nextcloud/Config/config.php in PuTTY and enter the following lines within the curly brackets:
'memcache.locking' => '\\OC\\Memcache\\Redis',
'redis' =>
array
(
    'host' => '<local NAS-IP or 127.0.0.1>',
    'port' => '6379',
    'timeout' => '0',
    'dbindex' => '0',
),
Save and close the file.
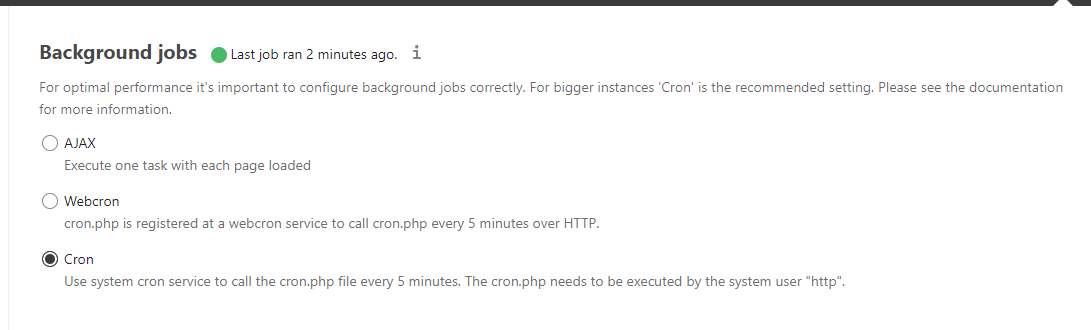
Background processes via Cron
Nextcloud does many tasks via background processes, but these also have to be executed. By default, this happens when a page is loaded, i.e. when someone opens the web interface. If nobody does that, the background processes will not be executed. It is better to have your DiskStation run these regularly. We use the Task Scheduler for this. Open the Control Panel in DSM and then the Task Scheduler. Create a new task (Create > Scheduled Task > Custom Script).
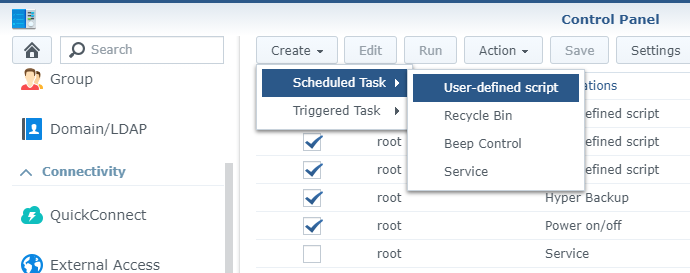
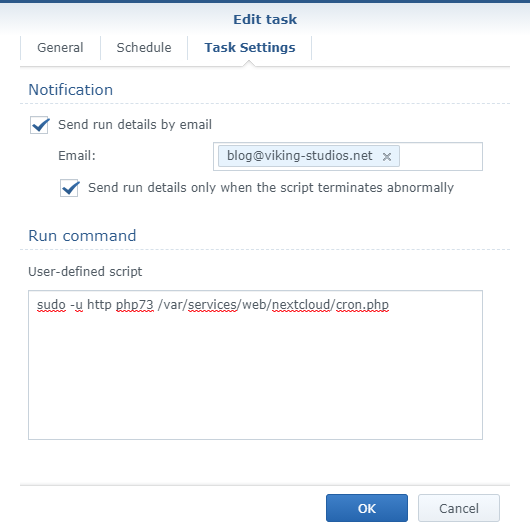
- Enter a name.
- Leave the user root.
- Under schedule you specify that the task should be carried out every 5 minutes on a daily basis.
- It is helpful to be notified by e-mail (“Send execution details by e-mail”) if the task could not be executed correctly (“Send execution details if the script exits abnormally”).
- Under “User-defined script” you enter the following line:
sudo -u http php74 /var/services/web/Nextcloud/cron.php
Confirm the new task by clicking OK. Now open Settings > Basic Settings> Background jobs in the Nextcloud web interface and activate the option Cron. Now wait a little more than 5 minutes and reload the page. The dot next to the heading must be green and it must have been less than 5 minutes ago.
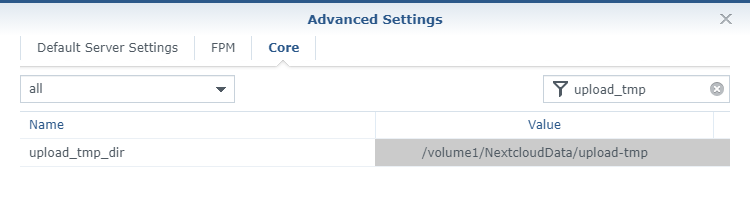
Solve/prevent upload issues
When files are uploaded, they are divided into chunks and stored in a temporary directory and only put together and moved to their destination after the upload is complete. This temporary directory can cause problems on a DiskStation, but this can be fixed quickly. Use the command line to create a new directory in your Nextcloud data directory and adjust the rights for it. E.g .:
mkdir /volume1/NextcloudData/upload-tmp
chown http:http /volume1/NextcloudData/upload-tmp
chmod 750 /volume1/NextcloudData/upload-tmp
Opens the PHP profile used (Web Station > PHP Settings) and switches to the Core tab. Looks for the variable upload_temp_dir and inserts the path to the new directory.
open_basedir tweaks
Opens the PHP profile for Nextcloud and enter the paths /dev/urandom and /proc/meminfo under “Customize PHP open_basedir” (don’t forget the colon to separate individual paths).
The missing PHP extension imagick
If you have installed Nextcloud with the latest Web Station and PHP 7.3, you will no longer see the error.
Synology not only released a package for PHP 7.4, but also decided to add support for ImageMagick. This also results in an update for PHP 7.3 and the Web Station. Update your Web Station and the PHP 7.3 package, then open Web Station > PHP Settings, select the PHP profile for your Nextcloud and click on Edit. Now activate the imagick extension under “Extensions”. The message then disappears.
The extenbsion is used to create favicons from uploaded logos in the theming area. In addition, the module is required by the gallery app, which displays different formats, such as RAW files. If you have deactivated/not installed the gallery app and the theming app, the message should not appear at all.
Even with the theming and gallery apps you could do without imagick, but the warning message still bothered many.
ImageMagick isn’t an official PHP extension and its use in Nextcloud is controversial because it is outdated and has security issues. Unfortunately, it is the only one that enables the features described above. ImageMagick is e.g. also used by WordPress. Imagick isn’t supported by every hosting provider either.
Assign standard phone region
In Nextcloud 21 there is a new message in the security and setup warnings section:
No standard telephone region is set for your installation.
This one is fixed easily. Open your Nextcloud config and add following line between the curly brackets:
'default_phone_region' => 'AT',
Replcae AT with DE, GB or any other ISO country code you want.
Adjust permissions
During the installation, the permissions for the Nextcloud folder and the data directory were set very loosely. This is necessary during the installation. For security reasons, the permissions should be set as strictly as possible for operation. Since you have to loosen the permissions again for an update, it is advisable to adjust the permissions via scripts. So use PuTTY to create a file with the extension .sh on your DiskStation. Then paste the following code:
#!/bin/bash
ncpath='/volume1/web/Nextcloud'
ncdatapath='/volume1/NextcloudData'
htuser='http'
htgroup='http'
rootuser='root'

printf "chmod Files and Directories\n"
find ${ncpath}/ -type f -print0 | xargs -0 chmod 0640
find ${ncpath}/ -type d -print0 | xargs -0 chmod 0750
find ${ncdatapath} -type f -print0 | xargs -0 chmod 0640
find ${ncdatapath} -type d -print0 | xargs -0 chmod 0750

printf "chown Directories\n"
chown -R ${rootuser}:${htgroup} ${ncpath}/
chown -R ${htuser}:${htgroup} ${ncpath}/apps/
chown -R ${htuser}:${htgroup} ${ncpath}/config/
chown -R ${htuser}:${htgroup} ${ncpath}/themes/
chown -R ${htuser}:${htgroup} ${ncpath}/updater/
chmod +x ${ncpath}/occ

printf "chmod/chown .htaccess\n"
if [ -f ${ncpath}/.htaccess ]
then
    chmod 0644 ${ncpath}/.htaccess
    chown ${htuser}:${htgroup} ${ncpath}/.htaccess
fi
    chown ${htuser}:${htgroup} ${ncpath}/.user.ini
Please pay attention to the single and double quotation marks again. You can now run the script with the following command:
sh /volumeX/Pfad/zum/Script/Betriebsberechtigungen.sh
If you want to update your Nextcloud, you can adjust the permissions using the script from this article and the new script before and after the update.
Script improvements
Since the permissions of the data directory don’t have to be changed during an update, you can remove the lines, that concern the data directory, after the first execution. If the data directory contains many files and folders, the execution may take a few minutes. Time that you can save yourself during the updates.
Issues that cannot be solved or can only be solved to a limited extent
So far, the security warnings and operating recommendations could be removed with relatively little effort. But now we come to the uncomfortable part. There are messages that cannot currently be resolved on the DiskStation, or only to a limited extent.
CalDAV- and CardDAV-URLs
The message “Your web server is not configured correctly to resolve” ./well-known/caldav “(or ./well-known/carddav).” Only appears if you have not configured a virtual host for Nextcloud. Since the default values for the URLs specified by Nextcloud are based on the document root, but Nextcloud is located in a subdirectory. If you have created a virtual host, the subdirectory is mage the root folder and therefore everything is fine. Usually there are many different ways to solve the problem simply by adding the subfolder to the URL. For reasons not yet known, this doesn’t work on Synology NAS devices. So you only have to set up a virtual host for Nextcloud, or to install Nextcloud directly in the document root (/web). The former means you need a host (subdomain) for Nextcloud alone, the latter means you cannot operate any other website in the document root.
Conclusion
If you have eliminated all messages (if they can be eliminated) and have adjusted the permissions, nothing stands in the way of operating your own cloud. At least until the next update. Because then new messages are probably waiting to be eliminated by you.
The development cycle of Nextcloud is quite short and besides the regular updates, new major versions wait to be installed twice a year. The messages that you receive in the Nextcloud overview depend heavily on which version you are installing, whether you are performing an update and which versions you have left out, and above all on how your web server is already configured. It may well be that you have reports that I have not yet come across. If that is the case, you will either find it in the previous version of this article or you can leave me a comment.
Great Blog. thanks very much. I found a typo which leads to an error in the cron job:
You are writing for the cron task:
sudo -u http php74 /var/services/web/Nextcloud/cron.php
but the cron job task should actually be with lower case ‘n’ in nextcloud
sudo -u http php74 /var/services/web/nextcloud/cron.php
Now the corn job runs correctly.
Hi,
It’s not a typo per se as you can name the folder however you want. Of course you have to adapt the path in any related command or script.
Regards
Andreas
Hi,
Very good work with this tutorial.
One point, not working for me about cron task.
I have followed wverything but replace : sudo -u http php73 /var/services/web/Nextcloud/cron.php with php74 because my install in on php 7.4.
I continue not working instead this modification.
Thanks
Hi Remy,
If you enter the Command directly on the commandline, or if you enable the Notification in the planned task you should get the error message, why it is not working.
BR
Andi
Hi,
I also have cron error. It tells me I’m not working apcu cache.
The script stops and nextcloud tells me that cron is not working
OCP\HintException: [0]: Memcache \OC\Memcache\APCu not available for local cache (Is the matching PHP module installed and enabled?)
Hi,
Please check if it is the issue mentioned here.
BR
Andi
Hi Andreas,
Thanks a lot for this awesome optimization guide! It is by far the most holistic guide I found. This is the reason why I think you should add one more thing – the mariadb optimization.
On my DSM7 with NC 22.1.0, I added a file “/var/packages/MariaDB10/etc/my.cnf” with the lines:
[mysqld]
transaction_isolation = READ-COMMITTED
binlog_format = ROW
After restarting the service with “/usr/syno/bin/synopkg restart MariaDB10”, this was a real game changer to my file upload performance.
BR, Conrad
I have Redis working correctly on my Synology NAS with OwnCloud and NextCloud. I used this site: https://digitalboxweb.wordpress.com/2020/02/01/redis-sur-nas-synology/
It’s in French, but pretty obvious what to do.
After doing all that, it still didn’t work until I changed the IP address in my config.php like this:
‘memcache.locking’ => ‘\\OC\\Memcache\\Redis’,
‘redis’ =>
array
(
‘host’ => ‘127.0.0.1’,
‘port’ => ‘6379’,
‘timeout’ => ‘0’,
‘dbindex’ => ‘0’,
),
Hello Phillip!
Thanks for link.
I followed a similar path. But the php-module (redis.so) grab from local installed Docker-container with debian (with APT-installed php7.4 and php7.4-redis).
Then manually edited .ini and .json on DSM as in the article above.
Hi Andreas!
Nextcloud not working with Redis. PHP-Redis module none in syno-php. IMHO.
I`m copying redis.so module from another host on debian and then modified php config files on DSM.
After this redis.log show working life…
Sorry for my bad english.
WBR,
Konstantin.
Hi,
I’m having same problema on DSM 6.2.3, Apache 2.4 and PHP 7.4 and I cannot install redis, not available at Synology Community… Any work arround for it?
What DiskStation do you have? Redis is not supported on certain CPU-Models used in newest DiskStations.
You don’t neccesarily need Redis. It is more a boost on quite slow systems but if your system is quite fast anyway, you don’t need it.
Regards
Andreas
Hi,
Redis should be available in the Package Center when you add the Community Package. If it is not there, your CPU is not supported.
Also Redis is not shown as an module in the PHP config.
You don’t neccesarily need Redis. It is more a boost on quite slow systems but if your system is quite fast anyway, you don’t need it.
Regards
Andreas
Hi Andreas,
First of all, thanks for the great pieces of work found in your blog. Following your explanatory articles was easy to install Nextcloud 20 directly on my Synology NAS.
My NC instance was installed on a DS3617xs (with DSM 7) with the following packages:
• Web Station
• Apache HTTP Server 2.4.43
• PHP 7.4
• phpMyAdmin 4.9.2
• MariaDB 10.3.21
I have used my own domain with a vHost and a Lets Encrypt SSL certificate, obtaining an A+ on SSL Lab Test. I have, however, an issue that I cannot solve, regarding ‘External storages’. When I tried to mount any NAS Shared folder as a Nextcloud External storage I could see an error message saying:
“smbclient is not installed. Mounting of ‘SMB/CIFS’, ‘SMB/CIFS using OC login’ is not possible”
And I couldn’t find any way to try to install this smbclient, nor a PHP7.4 extension for it.
On the other hand, if I try to install an External storage as Local, I can only see the directory tree of the nextcloud installation folder located in /volume1/web. The other option was using WebDAV, and I could mount a NAS shared folder, but this kind of connection was too slow to be used with other mobile clients outside of my home LAN.
I thank you once again for your time in reading this comment, and I remain with the wish that you can guide me on what may be the way to try to solve this issue.
Kind regards,
Hi Raul,
I never got external storage running with SMB. WHen I first did this, in the Nextcloud documentation there was a hint that NC has issues with SMB on Linux servers (and the DiskStation is a Linux server). I don’t know if this is still valid. But in this case it seems the issue is on Synology side. Unfortunately there is no easy way to install PHP extensions on a Synology NAS. You can ask the support if they will include smbclient in a future release.
Which data do you want to store there? WebDAV should actually be quite fast. The only speed issues I had was using WebDAV on Windows without a client.
Kind regards
Andreas
Hi Andreas,
Thanks for your answer. I have installed the default Nextcloud data storage in /volume1/nextcloud (as an usual Synology shared folder), but I want also to have available in my Nextcloud, as external storage, the information I already have in another shared folder of my Synology (e.g. /volume1/Water treatment docs/).
I tried it through WebDAV and opening the folder and viewing the file listing were extremely slow. This procedure is almost impractical.
Thanks
Hi Raul,
Seems strange, I use the /photo shared folder via WebDAV in Nextcloud. Which DiskStation model do you have? Maybe your hardware is limiting things a bit. The only other way I know, is to write a shell script that uses rsync to sync a folder in your Nextcloud data folder with the shared folder. This is not the best solution as it doubles the used space and also Nextcloud has issues with recognizing new files. You would need to do an occ rescan.
Kind regards
Andreas
Hi Andreas,
Could you please explain how to remove te index.php parts in the url? I see Nextcloud has written a how-to in their installation manual but for me this does not work. Does the Synology-setup have some sort of special solution?
Kind regards,
jespie
Hi jespie,
There shoudn’t be any special solution for Synology here. You just have to consider if you are using a vhost for your NC or not.‘ in the config file for the parameter ‘htaccess.RewriteBase’ => ‘/’,
If you use a vhost you have to enter ‘/’ if not you have to enter ‘/
Try to run sudo -u http php7X occ maintenance:update:htaccess in PuTTy (or how you connect to your DS via SSH) where the X in php7X is the Version of PHP you use.
The value gets written to the .htaccess file in your Nextcloud folder. Check if the entry was made. Otherwise the htaccess had wrong access rights.
Regards
Andreas