
Collabora has now replaced OnlyOffice in the integrated office solution. If you want better and more stable performance, you should provide Collabora as a Docker container. You can find out how to do this in this article.
Preperation
Before we get started, here is a small checklist of things you will need.
- Nextcloud, installed on the DiskStation, you can find instructions for this in this article. Nextcloud runs directly on the DiskStation web server. You can also deploy Collabora as a Docker container on DiskStation for a Nextcloud installation on another device or Nextcloud as a Docker container. In these cases, however, additional configuration may be necessary to ensure communication with the container.
- A DiskStation with Container Manager (Docker) installed. You can find this in the Package Center. If this is not the case, your DiskStation is too weak.
- You need a valid subdomain that you use exclusively for OnlyOffice.
Subdomain and SSL Certificate
If you want to access your cloud and Collabora over the Internet, your own domain and SSL certificates are essential. If you have secured Nextcloud via HTTPS, no connections to external services can be established via HTTP. Some Docker images also require an encrypted connection by default. A local domain and a self-signed certificate would be sufficient on the LAN, but I haven’t tested this and therefore can’t say whether Collabora allows this. If so, then additional configuration of the container is probably necessary.
For the purposes of the instructions, I assume that you have set up a subdomain (DDNS domain) that points to your external IP.
Setup
Make sure that the following instructions are what you want to achieve. Nextcloud is installed directly on the DiskStation, only Collabora is provided via Docker.
Provide Collabora/LibreOffice as Docker Container
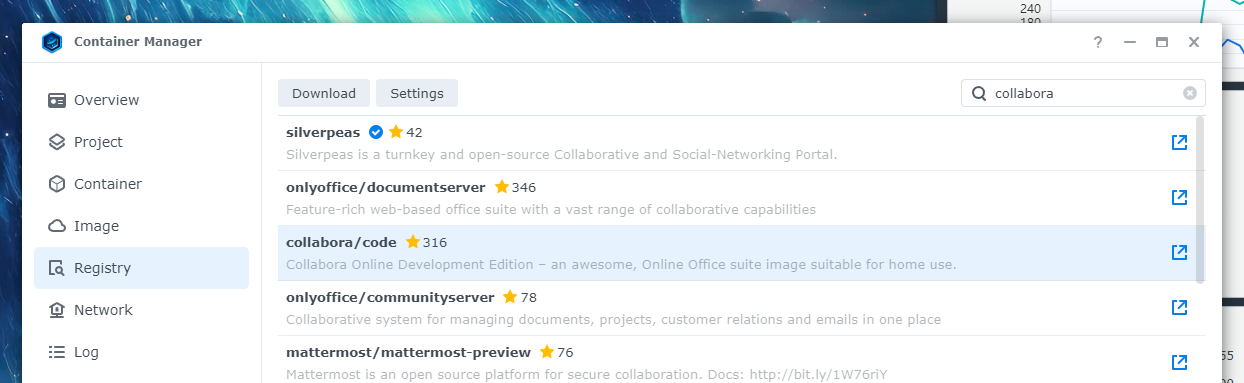
Open the Container Manager on your DiskStation and go to the Registry area. Use the search field to search for “collabora”. Download the image “collabora/code”.
Libreoffice
Anstelle von Collabora könnt ihr auch nach LibreOffice suche. Die erforderlichen Schritte zur Einrichtung sind ident.
Version “latest”
With “latest” you get the latest version at that moment. However, the image does not update itself and the Container Manager always only shows you the “latest” version. If you want a better overview, you can also select the current version yourself in the dropdown. For most images this is the highest number. Sometimes the images are also marked with additions such as alpha, beta, stable or release. Always make sure to use a stable or release version. If you are unsure, you can also use the blue icon to open the image’s documentation and read the current version there.
The “latest” image can be updated via the Container Manager with just one click. But this feature should be used with caution, as settings, environment variables or mounts may change during updates.
The Container Manager switches to the Image area and starts downloading the image. After the image has downloaded, highlight it and click Run. A dialog guides you through the creation of a container.
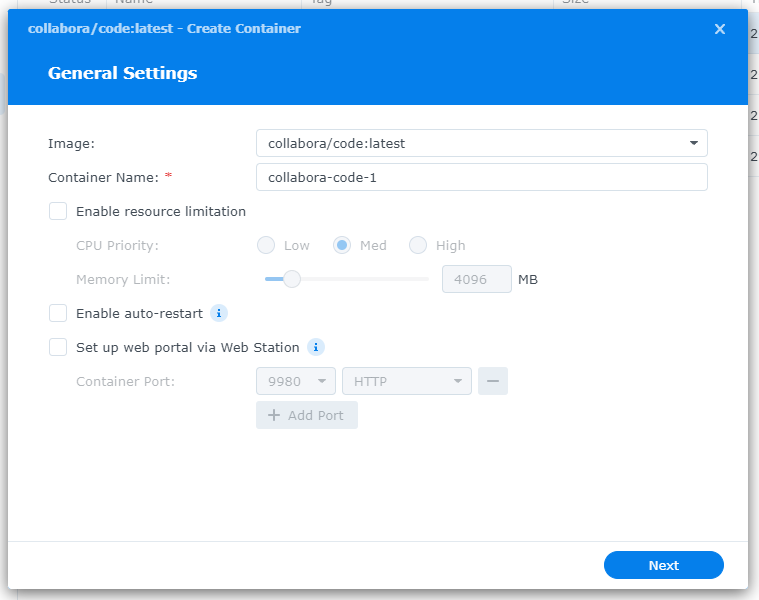
First you give the container any name you want. You can also limit the resources for the container if you want. When idle, the container requires virtually no CPU power, but a few hundred MB of RAM (values can increase depending on usage). How the container’s resources are used during use depends on how many documents are being processed at the same time or how many users access them.
Activates the checkbox for “Enable automatic restart”. If the container is not terminated properly due to errors or, for example, a DiskStation crash, it will be restarted automatically. Then click on Next.
Web portal via Web Station
This function is new; you can set up access to the container via the Web Station. Previously, access to the container was implemented via reverse proxy. I haven’t looked into the web portal in detail yet and don’t know whether it will replace the reverse proxy. I continue to use the reverse proxy (see below).
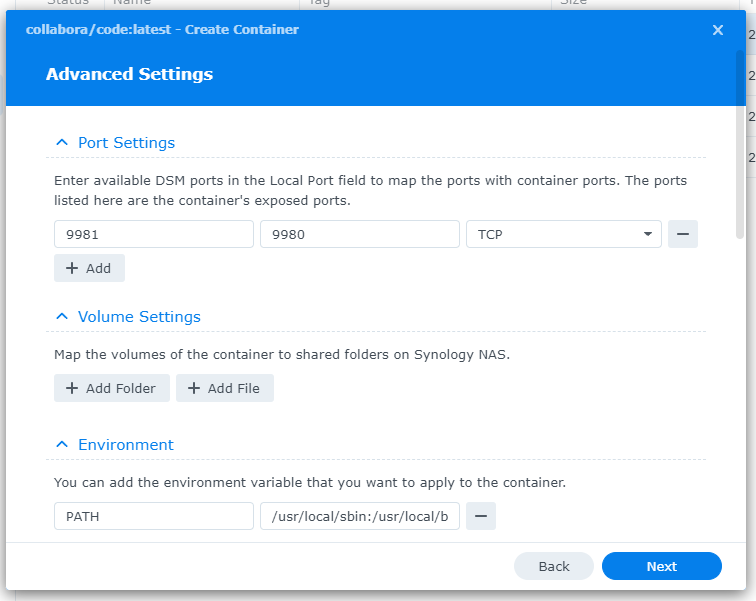
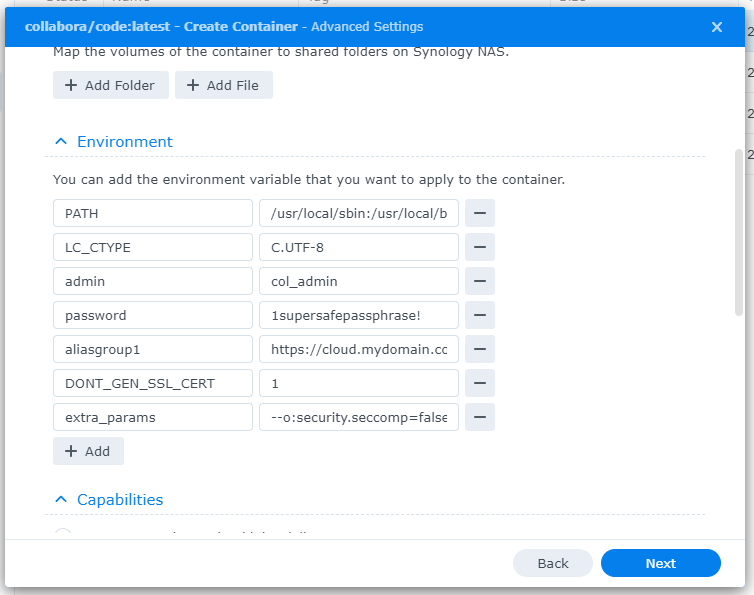
First you have to map the internal container port (9980) to a local port. This is necessary because the container should not run in the host network (i.e. your DiskStation), but in its own network. Assign the local port manually; selecting “Automatic” can mean that the container is not always assigned the same port numbers when starting, but this is important for connecting Collabora to your Nextcloud. If 9980 is already being used by another application on your DiskStation, you will be notified of this. You then have to enter a number yourself that is not yet in use. There are no folders in Collabora that you can mount. Under “Environment” you have to insert some environment variables. You can see what these are and which values are necessary in the table below.
Scroll down a little and select “bridge” under “Network”. No further settings are necessary. After clicking Next you will see a summary. Click Finish and the container will start.
| Name | Wert | Erklärung |
admin | col_admin (Sample) | User for the admin account within the container |
password | 1supersafepassphrase! (Sample) | Password for the admin account |
aliasgroup1 | https://cloud.mydomain.com:443 (Sample) | Your Nextclouds URL |
DONT_GEN_SSL_CERT | 1 | For not generating an SSL certificate as we do this somewhere else |
extra_params | --o:security.seccomp=false --o:security.capabilities=false --o:ssl.enable=false --o:ssl.termination=true | The parameter in extra_params do this:--o:security.seccomp=false disable Seccomp.--o:security.capabilities=false disable Capabilities. CAP_ADD ist then not needed anymore.--o:ssl.enable=false disables SSL/TLS within the container. --o:ssl.termination=true tells the container, that it exists behind a Procxy, that does SSL/TLS. |
SSL within the container is not necessary. First someone would have to get to your DiskStation to be able to take advantage of it and then you have completely different problems than the container anyway. We still secure the connection to your DiskStation itself or to the container from outside elsewhere.
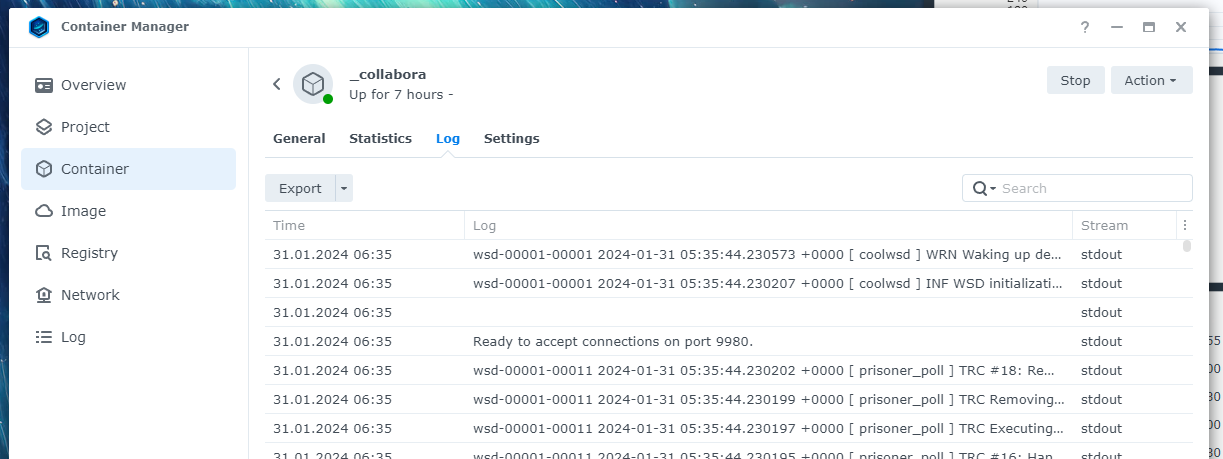
Go to the Containers area and first select the Collabora container and then click on Details. You can follow the startup process of the container in the Log tab. The output log does not update automatically. Go back to the container overview and reopen the log to get the updated output. It takes some time to start and requires some resources. Waiting for the message “Ready to accept connections on port 9980“. The container is now ready for use.
Setup a reverse proxy
Your container is now accessible at any address where your DiskStation can be reached + the local port. If your DiskStation can be reached via a domain that is secured with an SSL certificate, that would be enough. In order to be able to access documents from outside, you would have to enable the local port on the router. It is therefore better to set up a reverse proxy with its own subdomain. Then, only the HTTPS port on the router needs to be forwarded. This should already be the case if you can access your cloud from outside. You can find out more about port sharing, certificates and external accessibility in this article.
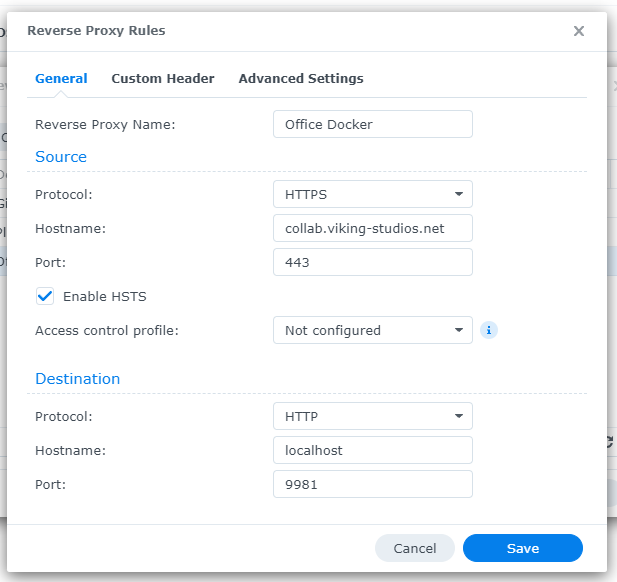
Open the Control Panel and go to Login Portal > Advanced > Reverse Proxy. Click on Create and give it any name you want. Under Source select “HTTPS” and enter the subdomain and enter 443 as the port. Additionally activates HSTS. You can leave “HTTP” as the destination and enter “localhost” as the host name. Use the container’s local HTTP port as the destination port. Make sure that you enter the container’s self-assigned port number and NOT the default port number 9980.
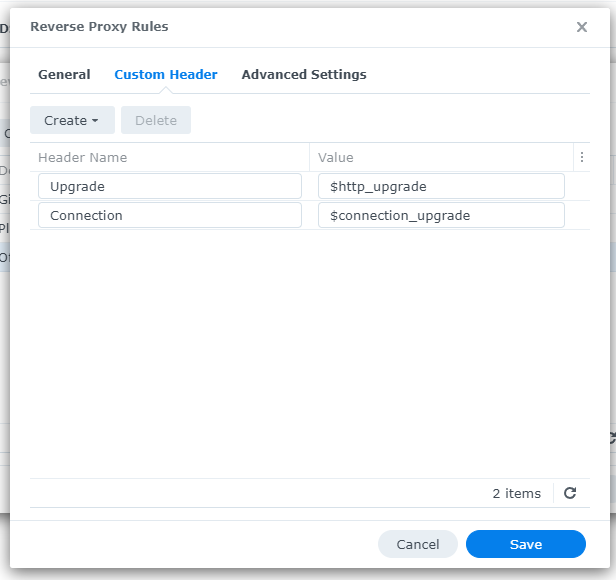
In order for the container to function properly, two pairs of values must be added to the Custom Header tab:
| Headername | Wert |
| Upgrade | $http_upgrade |
| Connection | $connection_upgrade |
Click on Save.
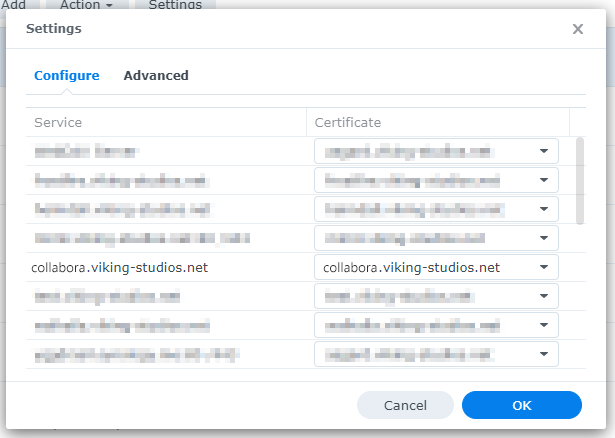
Now you need an SSL certificate for your subdomain. After creating the certificate, you also have to assign this to the reverse proxy (Control Panel > Security > Certificate > Settings).
The Collabora container is now accessible via its own SSL-secured subdomain. Test this by entering https://your-sub-domain.com in the browser. You should get a black window with the text “OK” in the top left corner.
Name resolution within a LAN
In many private networks, a domain cannot be resolved to a local IP address. It is not enough to regulate the resolution using the hosts file, as Nextcloud also has to resolve the domain. The name resolution in the LAN can be set in some better “prosumer” devices (e.g. Fritz!box). If your router doesn’t support this, you’ll need to set up a DNS server in the LAN (e.g. on your DiskStation).
Configure Nextcloud
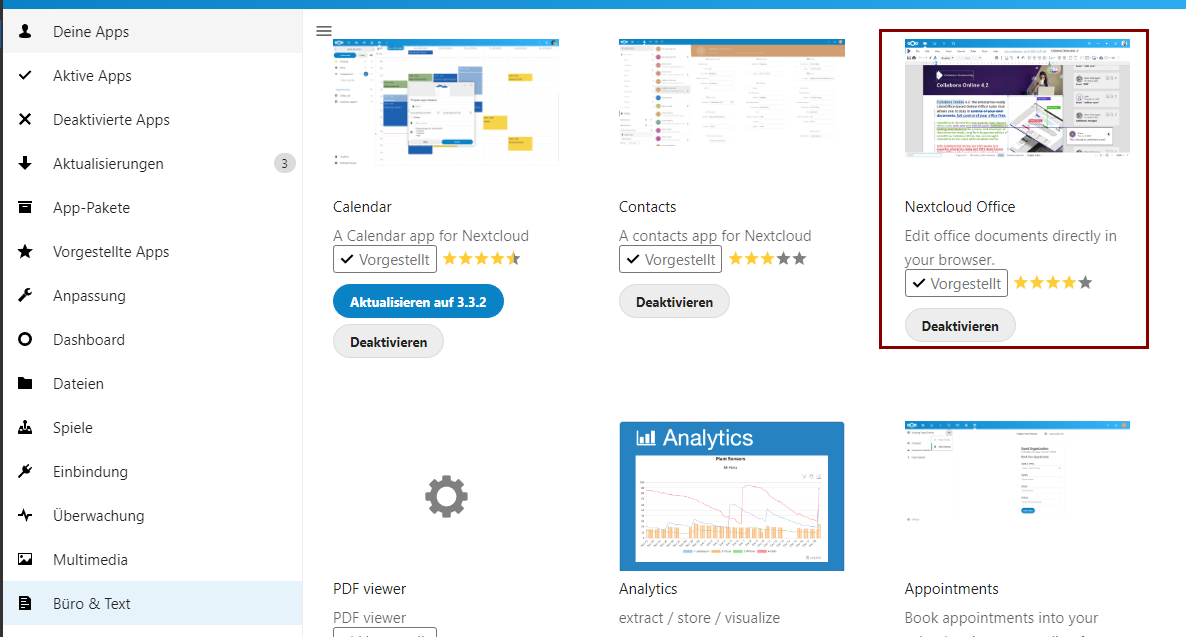
After we have prepared everything, it is time to set up Collabora in Nextcloud. If you are not using the integrated version of Collabora, check whether the Nextcloud Office app is installed (in the Apps section). If not, you can find it under “Office & Text”).
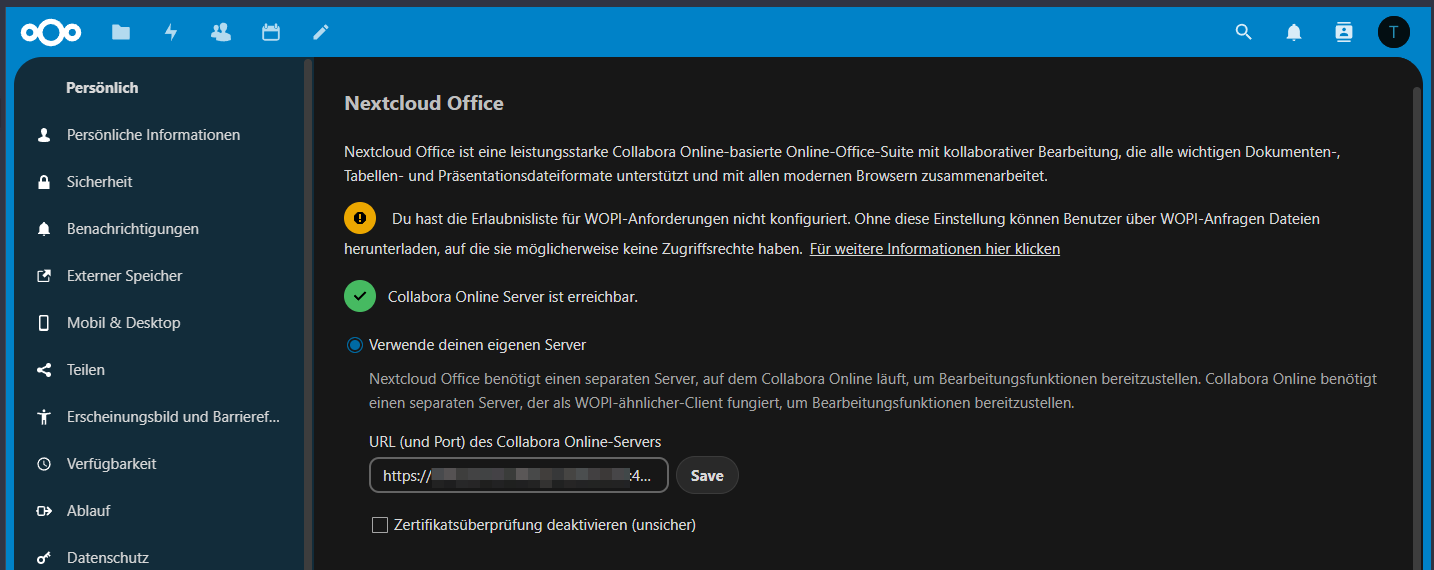
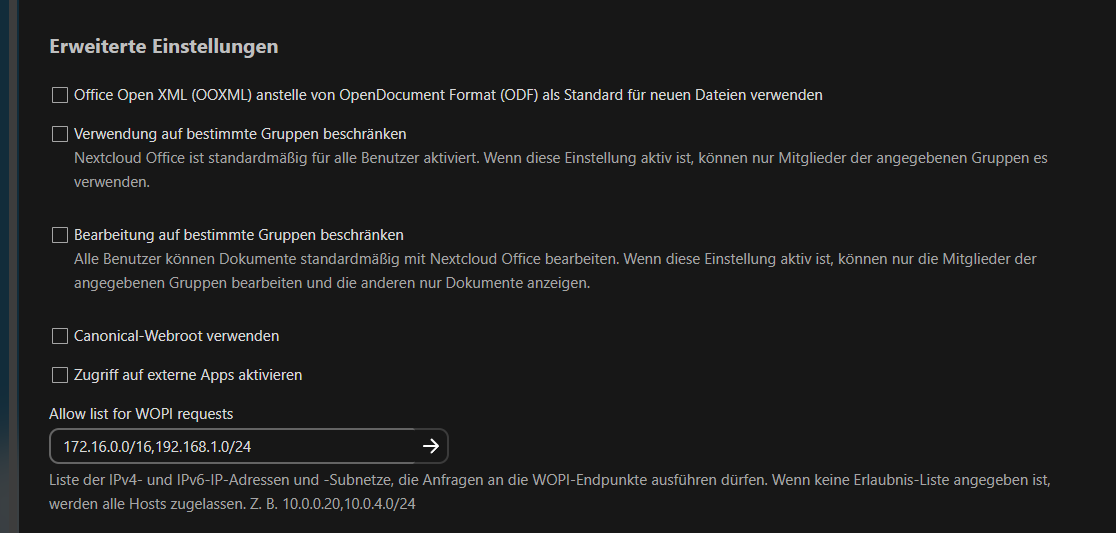
Then go to the administration settings and there to the Office area (the one under “Administration”, not under “Personal”). Enable “Use your own server” and enter the subdomain for the Collabora container. Further down you will find the “Advanced Settings” area. There you will find “Allow list for WOPI requests”. Enter the network of your container and your local network here (e.g. 172.16.0.0/16,192.168.1.0/24). You can read the network address of your container in the Network section of the Container Manager by opening the “bridge” entry. You get your local network from your router. It is important here to only separate the addresses with a comma and not to use spaces. The setting further increases the security of your container and the warning disappears. Then click on Save.
That’s it. You can now open and edit Office documents directly in the cloud, even with multiple users at the same time.
Security and access
If you use a firewall, you of course also have to take the container subdomain into account. Contrary to what you might expect, it’s not just Nextcloud that accesses this domain; when you open a document, the end device must also be able to access the subdomain.
Would you like more detailed step-by-step instructions for your Synology NAS, with a lot more background information, tips and tricks? Then get my knowledge as a comprehensive practical manual. You won’t find more information in any book about Synology and everything in the quality you always get from me.
Die 3rd Edition contains uptades for DSM 7.1 and the revised Web Station, Surveillance Station and Synology Photos.
The book directly from the publisher (German only).
Hi,
Sadly, I had to fall back to onlyoffice because of the strange bug described here : https://github.com/nextcloud/richdocuments/issues/3185
In short, export to PDF fail when the document filename contains spaces…
The only solution at the moment is to set –o:security.capabilities=true and I can’t find a way to make a working Collabora compose on my Synology with this setting.
I hope the devs will find a workaround for this silly bug.
Hi,
just wanted to thank you (very, very much) for this detailed how-to, I was struggling since many month to get Collabora to work on my Synology… Was about to ragequit and return to onlyoffice which I really dislike for many reasons… Then I don’t remember how but I found your blog post, and your walkthrough worked flawlessly! My mistake was “extra_params” settings, I did not add all of them at once.
Your solution should be listed in collabora/code github!