
The 2nd major update for DSM 7 is here and in addition to some new functions, the WebStation has been revised. That’s why I have created these revised guide. The demand for Nextcloud is still high. Although Synology offers its own cloud solution, Synology Drive, it is nowhere near as comprehensive and flexible as Nextcloud. Be it calendar and contact synchronization or the apps and web interface, there are many reasons to use Nextcloud on a DiskStation. The article explains step by step how to install Nextcloud on a Synology NAS.
Preperation
Hint
Always type commands for the command line by yourself, do not copy them from the post. Double and single quotation marks are formatted differently in the text than in the command line. If you copy the characters, you adopt the wrong formatting, the characters are not recognized and the commands do not work.
Also create scripts directly via the command line (with vi). If you create scripts with an editor on your computer and upload them to your DiskStation, they may contain control characters that prevent execution.
Before we can start, check if you already have installed the Web Station, if not do so. You also need SSH access (to be found in the Control Panel under Terminal & SNMP) on your NAS (e.g. with PuTTY).
Important: If you are currently using Nginx as a web server, you have to switch to Apache HTTP Server 2.4 in the Web Station under Web Service > Default Service > Edit. Nextcloud does not run under Nginx without configuring it beforehand. So far there is no working configuration for Synology in the community. You can set up a vhost for Nextcloud that uses Apache, then you can switch the rest of your DS back to Nginx.
You have to install following packages from the Package Center:
- PHP 8.2 or higher
- phpMyAdmin (only needed in case of installation issues)
- Apache (2.4)
- MariaDB 10
Open MariaDB 10 and tick “activate TCP/IP connection”.
Shared Folder
Creates a new shared folder to store the data. Nextcloud saves the data by default in the data folder under /web/Nextcloud. For security reasons, Nextcloud recommends creating the storage location outside of the /web folder. This also makes it easier to upgrade from Nextcloud at a later date. Nobody else should have access to the shared folder and even as an administrator you should only make changes there if they affect your Nextcloud installation. You should then make these changes via PuTTY as root, otherwise the ownership will change and Nextcloud can no longer access the folder/files. Create the shared folder via DSM > Control Panel > Shared Folder, if you create the folder via PuTTY, DSM does not recognize it and you cannot save it e.g. via Hyper Backup.
Using the folder /data within the DiskStation
In general, only Nextcloud should manipulate data in the data folder. If you added or changed files via the DS or not via the cloud, Nextcloud wouldn’t notice. If you want to edit your files or a specific folder outside of Nextcloud, you have to insert it as external storage.
So that PHP can also access the shared folder, the path must be entered in open_basedir. Details can be found in the section “PHP Profile“.
Open PuTTY and connect to your DS. Log in as an administrator. To execute the commands as root enter sudo –i and press (Enter). Enter your administrator password again. Enter the following two commands so that Nextcloud or the user of the web server can also access it:
chown http:http /volume1/nextcloudData
chmod -R 777 /volume1/nextcloudData
PHP profile
Virtual Host
I recommend using a virtual host for your cloud. Nextcloud can thus be better secured, causes fewer problems afterwards and you can then use an individual PHP profile. Without a virtual host, all websites and applications use the same web server and the same PHP profile, which can lead to configuration conflicts. More on this below.
Open the Web Station and create a new profile under Script Language Settings.
- Enter a name and a description.
- Select PHP 8.2 (or higher).
- Tick “Enable PHP cache”.
- Tick “Customized” under “Customize PHP open_basedir” and enter
/tmp:/var/services/tmp:/var/services/web.Now add the path to the shared folder created above (don’t forget the : ). It could look like following line:/tmp:/var/services/tmp:/var/services/web:/volume1/nextcloudData - Activate following PHP extensions: bcmath, bz2, curl, exif, ftp, gd, gmp, iconv, imagick, intl, mysqli, openssl, pdo_mysql, posix, sodium, ssh2, sysvsem, zip, zlib
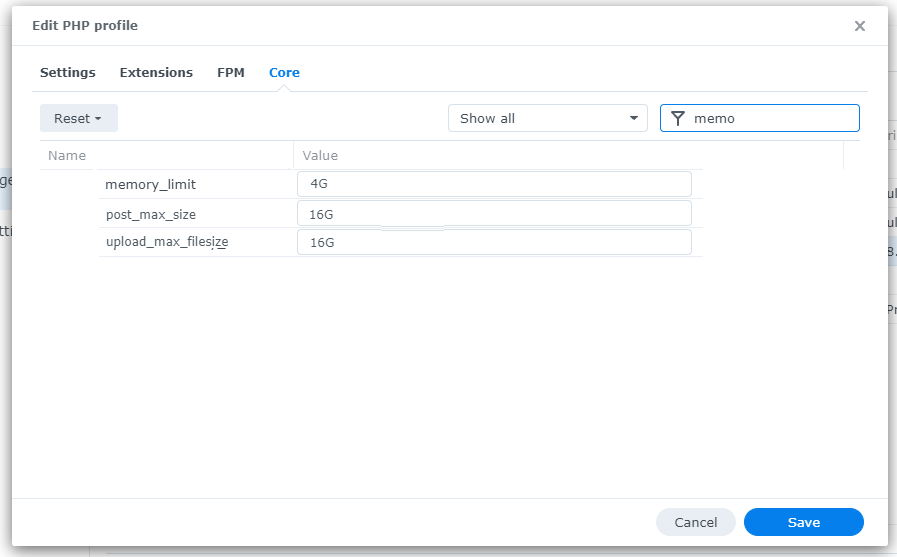
- You can leave the FPM settings as they are. In the next step, the PHP variables can be adjusted. First look for memory_limit and enter the RAM that you want to make available to Nextcloud. At least 2GB is currently required. Depending on the available RAM on your NAS, you can of course allocate more. The allocated storage is not automatically occupied, you only set the limit that Nextcloud can use. Then look for the variables post_max_size and upload_max_filesize and enter a high value there (e.g.: 16G). This is not about RAM, but rather the size of the file that you can upload at once. Google will tell you the difference between the two variables, but in most cases the same value for both variables is sufficient. The web interface is rarely used to upload large amounts of data anyway.
- Close the dialog.
Installation
Download the latest version of Nextcloud as a .zip or .tar here (under Community Projects > Archive > Get ZIP file). Upload the zip file to your DiskStation and extract it into the /web folder.
Tipp
To increase security, you can rename the Nextcloud folder. This prevents it from being found by crawlers searching web roots for standard names.
Now would be the right time to create the virtual host. You can also create the vHost after the installation.
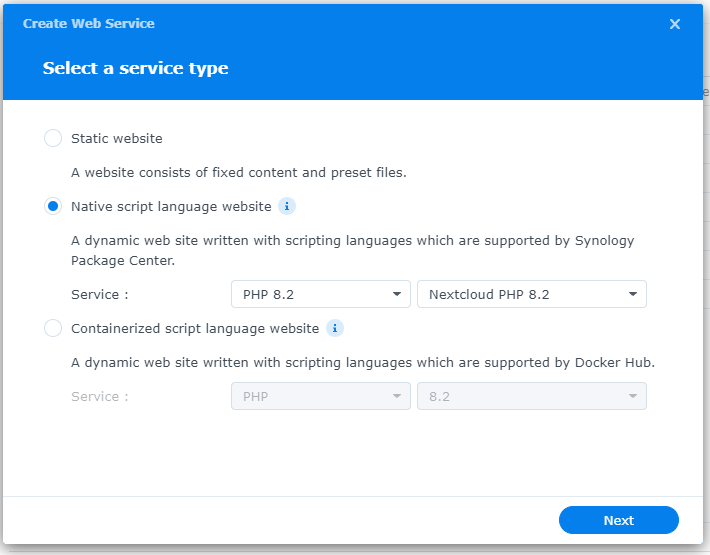
To do this, select Web Service in the Web Station and create a new entry. Select “Native script language website” and select the PHP version and the recently created PHP profile. In the following step, the values below have to be provided:
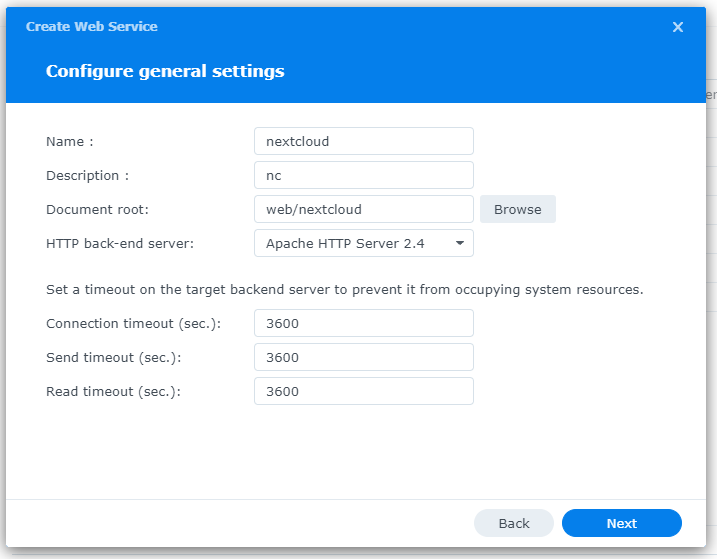
- Assign any name (only lowercase letters, numbers, – and _ ) and a description.
- Select the Nextcloud folder (
/web/nextcloud) as the document root. - Choose Apache 2.4 as the HTTP backend server.
- Increases all three timeouts to at least 600, preferably 3600. (Yes, the values actually do something now, no more hacks in config files)
- Selects the ports for which the virtual host applies (typically 80/443).
Complete the dialogue. If you can’t use a vHost, you have to edit the default service and change the HTTP backend server from Nginx to Apache 2.4 and select the PHP profile you created previously.
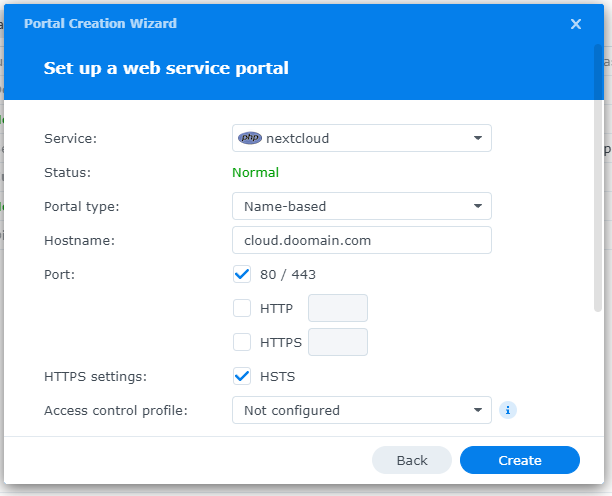
Switch to the area Web Portal. Here too, create a new entry with the following information:
- Select “Web services portal”.
- As a service, select the entry previously created under Web Service.
- Enter the host name under which you want to access your Nextcloud. (The hostname must exist and point to your DiskStation, more on that in this article.)
- Be sure to activate “HSTS”, which ensures that all http requests to your cloud is redirected to https. However, this requires a valid SSL certificate that was issued for the domain used. You can also find instructions for this in the previously linked article.
Change the privileges of the Nextcloud folder. Enter following commands on the command line:
#!/bin/bash
chown -R http:http /volume1/web/Nextcloud/
chmod -R 777 /volume1/web/Nextcloud/
Hint
The privileges are only intended for installation, for safe operation the access rights should be kept as strict as possible. Read here how to adjust the privileges after the installation.
Execute the installation assistant
Open Nextcloud in the browser. Make sure to use the address you have given for the virtual host (e.g. cloud.mydomain.com), if you have not configured a virtual host, use the IP, the name of the DiskStation or a domain that points to the DiskStation, followed by the Nextcloud- Directory (e.g. mynas.synology.me/Nextcloud) The address you use here is entered as a trusted domain during the installation. If you want to allow Nextcloud from other domains you have to enter this later in the config.php. This is the case if, for example, you want to access the cloud later via your own domain or DynDNS, but use the local name or the local IP of the DiskStation during installation.
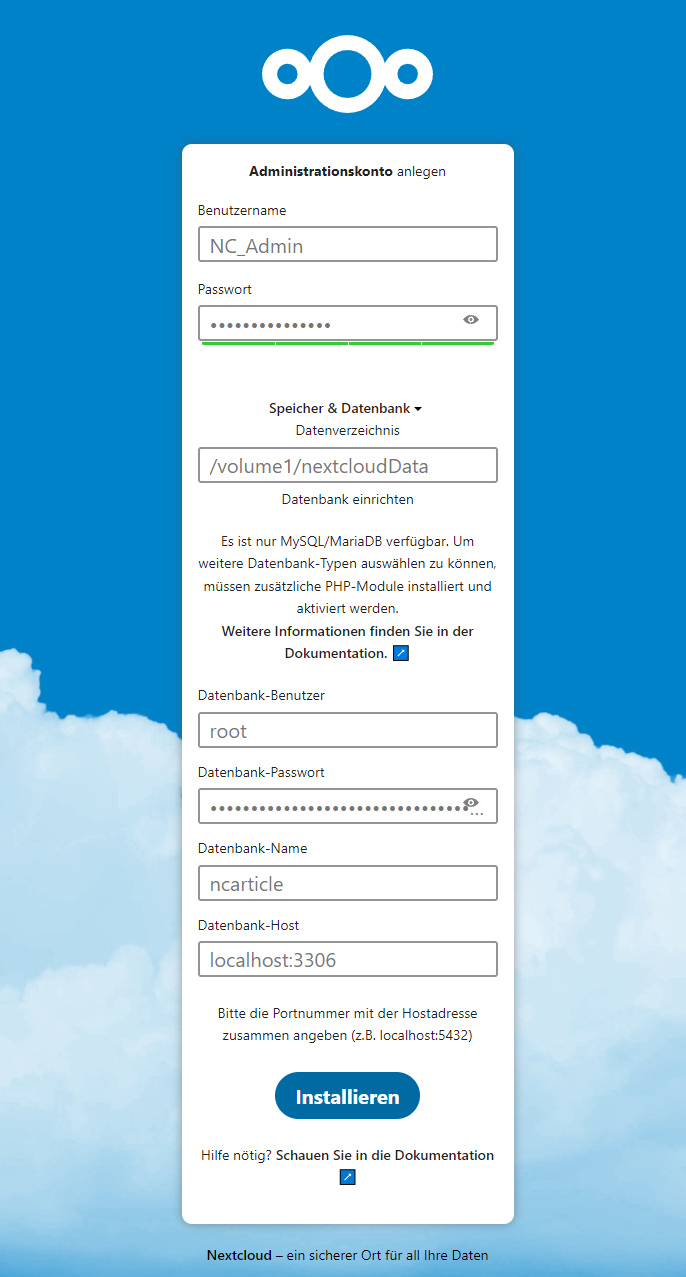
Enter a username and password for the Nextcloud admin (the NC admin has nothing to do with the DiskStation admin). Under Storage & Database > Data Directory, /volumeX/web/nextcloud/data is entered by default, enter the path to the shared folder that you created earlier.
In the last section, enter the root (or other user who is allowed to create users and databases) and password. The assistant creates your own user and password for NC operation; the data specified here is not saved. Entrer a database name. “localhost” is pre-entered for the database domain, you still have to add the port, MariaDB has 3306 by default. You can change the port in MariaDB 10.
Click the “Install” button to complete the setup. Now sit back and wait for the installation to complete.
You still have the option to install the recommended apps. Skip this step and install the required apps by hand. Not all apps can run on every DiskStation and with Office and Talk some very large apps are installed that you may not need or won’t be able to use.
Activate OnlyOffice
Coming soon
Nextcloud optimization
Important
Nextcloud is not yet fully functional ()for actual usage). Some of the following steps are necessary for error-free operation and for a functioning cloud update and of course for a secure use.
After installation, some adjustments to the settings are necessary. Some of them are even suggested to you by your Nextcloud. You can find these error and advisory messages in the menu under Administrator Settings > Overview > Security and Configuration Warnings. Since the DiskStation does not always behave like a normal Linux server, it is important to find out where the configuration changes can be made effectively and what additional steps are required.
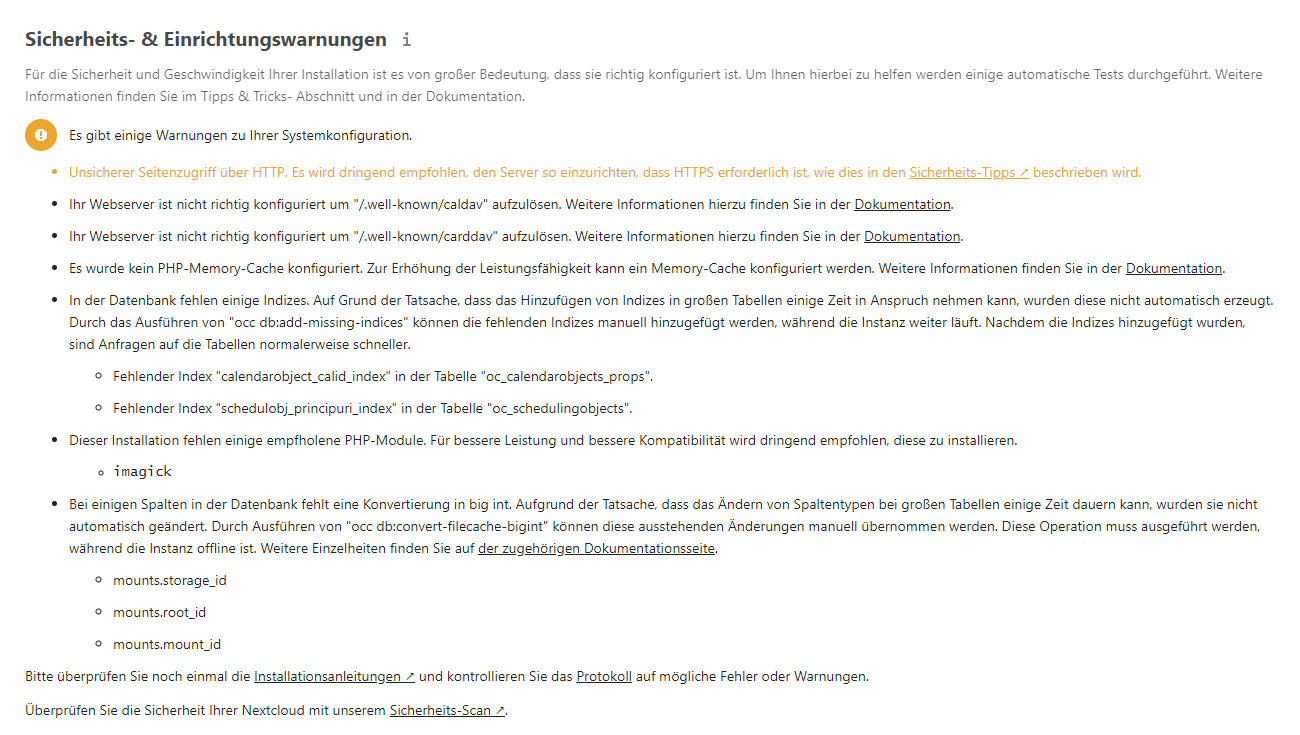
In the admin area under Overview you will most likely see some errors. You will find out how your Nextcloud is optimized and configured for actual use next time.
Beware the path
Make sure to adjust any path information if your /web directory is on a different volume than specified here or if the installation directory is not called “Nextcloud”.
Attention
Always make changes to the files mentioned here via the command line as root (sudo -i) and never via the DiskStation’s text editor. In contrast to the command line, the text editor changes the owner and the permissions.
Activate PHP memory cache
The memory cache improves the performance of your cloud. If you followed my installation instructions, you have already activated it and just need to enter it in the Nextcloud configuration. If you haven’t activated the cache, you can do so by checking “Activate PHP cache” in your PHP profile.
To enter the cache in the Nextcloud configuration, open the file /web/Nextcloud/Config/config.php with PuTTy and add the following line at the end of the file (before the closing bracket):
'memcache.local' => '\OC\Memcache\APCu',
Attention
Type input by hand rather than copying it from websites. If you insert single or double quotation marks into the text editor on the command line, it may happen that these characters are not encoded correctly and are not recognized as such. The configuration will then not be loaded.
It can also happen that I make a mistake. The mean thing is that if you make a mistake in the cache config, there is no error message. Nextcloud runs fine, just without cache.
Save and close the file.
Activate Redis
Redis improves file locking and can be used as a distributed cache. To use Redis, you need to install the “Redis” package on your DiskStation. You can find it in the community repository.
Unfortunately, it doesn’t work without a workaround under DSM 7.2 either. You now have the Redis server, but you also need the Redis client as a PHP module. Redis is delivered with the Synology PHP packages, but you cannot activate Redis in the WebStation. You have to do this via the command line.
Die erste Änderung gilt für Redis im Webserver, ohne diese Änderung erhaltet ihr einen “Internal Server Error”. Öffnet die Datei /volume1/@appstore/PHP8.2/misc/php-fpm.ini und fügt dort ganz am Ende folgende Zeilen hinzu:
The first change applies to Redis in the web server, without this change you will get an “Internal Server Error”. Open the file /volume1/@appstore/PHP8.2/misc/php-fpm.ini (or whatever PHP version you use) and add the following lines at the very end:
[Redis]
extension = redis.so
Activate the cache on the command line
You have to do something similar in the configuration for the CLI version of PHP, otherwise the cron won’t run.
You have already activated the PHP cache, but this only applies on the server side, i.e. when PHP is called by the web server. So that you can call up the cloud’s background tasks via Cron (see below) and execute Nextcloud’s command line commands (occ commands, which are required for updating the cloud), you must also activate the cache on the command line. Like so many things, this doesn’t work on the DiskStation like it does on a normal Linux server, or rather not where you might expect.
Create the file /usr/local/etc/php82/cli/conf.d/user_settings.ini via the command line (e.g. with PuTTY) and insert the following content there:
extension = apcu.so
extension = redis.so

[apc]
apc.shm_size = 512M
apc.enable_cli = 1
Save and close the file. Now you have to adjust the permissions:
chmod -R 644 /usr/local/etc/php82/cli/conf.d/user_settings.ini
Thank you, Guido
My solution just lasted until reboot. Thanks Guido for an alternative and longer lasting solution. The CLI config also survives a DSM update, the php-fpm.ini may not. An update of the corresponding PHP package could also overwrite the changes.
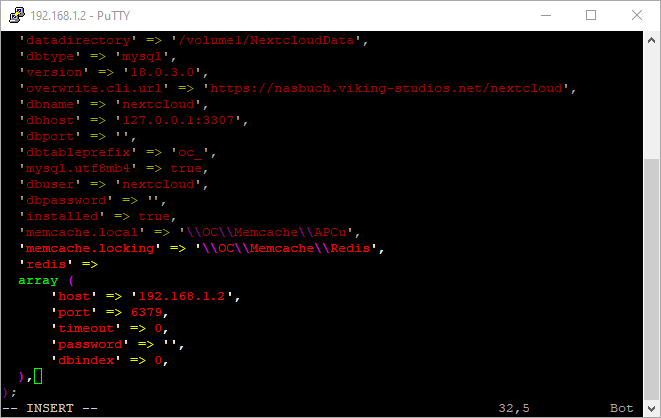
Open the file /web/Nextcloud/Config/config.php in PuTTY and enter the following lines (preferably below 'memcache.local' …):
'memcache.distributed' => '\OC\Memcache\Redis',
'memcache.locking' => '\OC\Memcache\Redis',
'redis' =>
array (
    ‘host’ => ‘localhost’,
    'port' => '6379',
    ‘timeout’ => 0.0,
    ‘password’ => ”,
    ‘dbindex’ => 0,
),
Save and close the file. Now you have to restart the web server, which is a bit complicated. You can restart the DiskStation or set up a start and a stop task for Apache using the task scheduler. The last alternative is to change the PHP version in a vHost, which will also restart Apache.

Background jobs via Cron
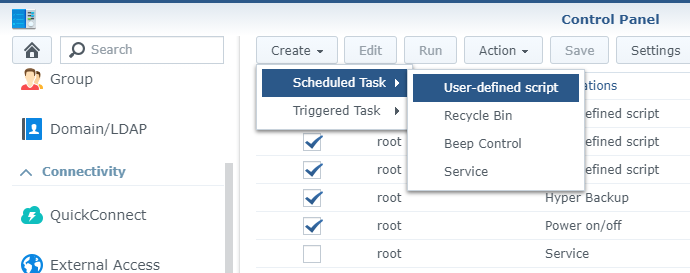
Nextcloud handles many tasks via background processes, but these also have to be executed. By default, this happens when a page loads, i.e. when someone opens the web interface. But if no one does this, the background processes will not be executed. It is better to have your DiskStation run this regularly. For this we use the Task Scheduler. Open the Control Panel in DSM and there, the Task Scheduler. Creates a new task (Create > Scheduled Task > User-defined Script).
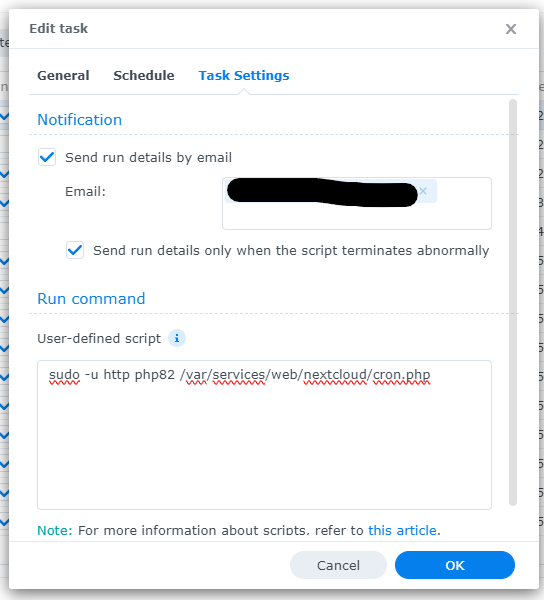
- Enter a name.
- Leave the user root.
- Under Schedule you specify that the task should be carried out every 5 minutes and that every day.
- It is helpful to be notified by email (“Send execution details by email”) if the task could not be executed correctly (“Send run details when script exits abnormally”).
- Under “User-defined script” enter the following line:
sudo -u http php82 /var/services/web/nextcloud/cron.php
Confirmr the new task by clicking OK.
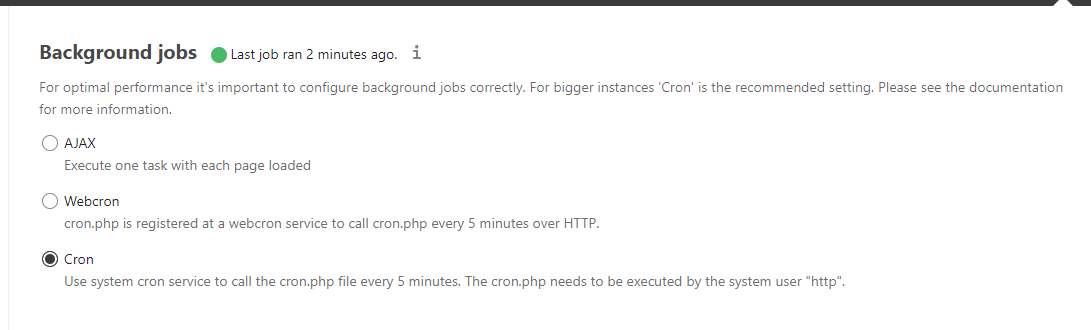
Now open Settings > Basic Settings > Background Tasks in the Nextcloud web interface and activate the Cron option. Now wait a little more than 5 minutes and reload the page. The dot next to the heading must be green and the last execution must be less than 5 minutes ago.
Activate HSTS/https redirect
If you used my instructions for the installation and followed my recommendation to set up your own virtual host for Nextcloud, you should not receive this message at all. If so, check whether you have HSTS activated. If you have not created a virtual host, you can create one now (see above).
If you don’t want to or can’t use a virtual host, you can also activate HSTS globally on your web server. In PuTTY as root, create the file /etc/nginx/conf.d/http.hsts.conf and insert the following line:
add_header Strict-Transport-Security "max-age=15768000; includeSubDomains; preload;";
Attention
Always create new files via the command line. Never create these on your computer and then upload them. The encoding of the text file is usually incorrect and the script cannot be executed or the configuration cannot be read.
Save and close the file and restart Nginx afterwards (synosystemctl -restart nginx).
Proxy
Why configure Nginx when Nextcloud runs on Apache? Nginx is used as a proxy on Synology NAS devices. Even if you use Apache as a web server, all requests will always go through Nginx, so activating HSTS is sufficient here.
Extend open basedir
Open the PHP profile for Nextcloud and under “Customize PHP open_basedir” add the paths /dev/urandom, /proc/meminfo, /proc/cpuinfo, /proc/uptime and /sys/class/net/eth0 (forget the colon to separate individual paths).
Standard phone region
Simply open your Nextcloud config and add the following entry in the curly brackets:
'default_phone_region' => 'AT',
Replace AT with EN or any other ISO country code you want.
Mail server configuration
In order to use certain Nextcloud functions, you must configure an email address. To do this, go to the settings and enter the settings of your email account under “email server”.
Runtime permissions
During the installation, the permissions for the Nextcloud folder and the data directory were only set very loosely. This is necessary to perform the installation. However, for security reasons, the permissions for operation should be set as strictly as possible. Since you have set wider permissions again for an update, it is advisable to adjust the permissions using scripts. So use PuTTY to create a file with the ending .sh on your DiskStation. Then insert the following code:
#!/bin/bash
ncpath='/volume1/web/nextcloud'
ncdatapath='/volume1/nextcloudData'
htuser='http'
htgroup='http'
rootuser='root'

printf "chmod Files and Directories\n"
find ${ncpath}/ -type f -print0 | xargs -0 chmod 0640
find ${ncpath}/ -type d -print0 | xargs -0 chmod 0750
find ${ncdatapath} -type f -print0 | xargs -0 chmod 0640
find ${ncdatapath} -type d -print0 | xargs -0 chmod 0750

printf "chown Directories\n"
chown -R ${rootuser}:${htgroup} ${ncpath}/
chown -R ${htuser}:${htgroup} ${ncpath}/apps/
chown -R ${htuser}:${htgroup} ${ncpath}/config/
chown -R ${htuser}:${htgroup} ${ncpath}/themes/
chown -R ${htuser}:${htgroup} ${ncpath}/updater/
chmod +x ${ncpath}/occ

printf "chmod/chown .htaccess\n"
if [ -f ${ncpath}/.htaccess ]
then
    chmod 0644 ${ncpath}/.htaccess
    chown ${htuser}:${htgroup} ${ncpath}/.htaccess
fi
    chown ${htuser}:${htgroup} ${ncpath}/.user.ini
Please pay attention again to the single and double quotation marks. You can now run the script with the following command:
sh /volumeX/path/to/script/runtimepermission.sh
Issues, that can not be solved or only to some extent
So far, the safety warnings and operating recommendations have been able to be eliminated with relatively little effort. Now we come to the unpleasant part. There are messages that cannot currently be resolved or can only be resolved to a limited extent on the DiskStation.
CalDAV and CardDAV URLs
The message “Your web server is not properly configured to resolve “./well-known/caldav” (or ./well-known/carddav).” Only appears if you have not configured a virtual host for Nextcloud. Because the default values for the URLs specified by Nextcloud come from the document root, but Nextcloud is located in a subdirectory. If you have created a virtual host, the subdirectory is configured as document root and everything is fine. Usually the problem could be solved in many different ways by simply adding the subfolder to the URL. However, for reasons not yet known, this does not work on Synology’s NAS devices, or to be more precise, not for all users. There are several solutions to the problem but they don’t always work for everyone. Ask the search engine of your choice for the solutions and try them out. If that doesn’t work, your only option is to set up a virtual host for Nextcloud or install Nextcloud directly in the document root (/web). The first means you need a host (subdomain) just for Nextcloud, the second means you cannot operate any other website in the document root.
Conclusion
Once you have eliminated all messages (if they can be eliminated) and adjusted the permissions, nothing stands in the way of operating your own cloud. At least until the next update. Because then there will probably be new messages waiting for you to remove them.
Nextcloud’s development cycle is quite short and in addition to regular updates, new major versions are waiting to be installed twice a year. The messages you receive in the Nextcloud overview depend heavily on which version you installed, whether you updated and which versions you left out and, above all, on how your web server is already configured. It may well be that you have reports that I have not yet come across. If that is the case, you will either find it in the previous version of this article or leave me a comment.
Now you can use Nextcloud directly in the browser, or you can download the client. The client works very similarly to Dropbox. You can synchronize your entire cloud with your computer or just individual folders. Synchronizing individual folders is also very helpful if you already have an existing folder structure for your data (images, videos, files, etc.) – e.g. on different drives – and you want to keep it. The client also allows the use of multiple Nextcloud instances. The client app for smartphones also offers the option to upload images automatically. Not all of the data itself is downloaded to the smartphone until you access individual files via the app.
Would you like more detailed step-by-step instructions for your Synology NAS, with a lot more background information, tips and tricks? Then get my knowledge as a comprehensive practical manual. You won’t find more information in any book about Synology and everything in the quality you always get from me.
Die 3rd Edition contains uptades for DSM 7.1 and the revised Web Station, Surveillance Station and Synology Photos.
The book directly from the publisher (German only).
Related Posts
None found
Excellent how-to and thank you very much. Just need to clarify a couple of things that seems unique on 7.2. The only way Nextcloud recognized the commands correctly in the config.php for PHP memory cache and Redis Distributed and File Locking were using the commands below (NOTE the double slashes in the commands)
Worked perfect in conjunction with all the other required commands inserted into files as described by the author.
‘memcache.local’ => ‘\\OC\\Memcache\\APCu’,
‘memcache.distributed’ => ‘\\OC\\Memcache\\Redis’,
‘memcache.locking’ => ‘\\OC\\Memcache\\Redis’,
‘redis’ => [
‘host’ => ‘localhost’,
‘port’ => 6379,
],