
I skipped this topic in my Nextcloud posts. It is related to Nextcloud but not required to run Nextcloud. Also most the steps that are needed to externally access your Nextcloud, apply to any other service, provided by your DiskStation (or servers in general). Also I did the setup in DSM5. When updating to DSM6 the settings got applied automatically. Unfortunately the places where to find those options changed and I also experimented a lot which made it hard to note down which steps are necessary and where to change things. Nevertheless, the topic is important and I reconstructed the setup.
In the meantime I did a complete reset of my DiskStation and verified the steps.
This tutorial works (beside the Synology part) for any server based service in you LAN.
About the Synology part: The tutorial shows how to set up external access to the Web Station but with a few changes it also works on any other package like the Photo Station or the Video Station. But keep in mind that different services need different steps to keep them secure. This article covers only security related to Web Station and Nextcloud, also it isn’t a complete guide to network security.
Prerequisites
- Nextcloud running on your DiskStation. See here how to do that.
- A router, that you are able to configure (NAT/Portforwarding, optional DDNS) that has access to the internet.
- One of the following options:
- either a static IP, usually you don’t have that as a private customer (this may vary, depending on the country you live in), sometimes you can negotiate with your provider to get one. At some providers you are able to order a business package (and those are sometimes not more expensive than the private ones) even as a private customer.
- or you get a DDNS-Account somewhere. Read below for more details.
- A device that has internet access but is not connected to your LAN (e.g. smart phone)
- (Optional) Your own domain. It is not required, you can use the (static) IP, also DDNS provider mostly five you domains like this: <aName>.<DDNSprovider>.<com/net/…> .
Setup DDNS
If you don’t have a static IP you need DDNS. You get a free DDNS-Entry from Synology, if you register your DiskStation. Beside being free, you can access the Synology-DDNS directly via DiskStation. Downside: You only have von Subdomain per registered DiskStation: <YourDS>.synology.me. Usually this is OK, you only have one external IP anyway. Even if you want to expose different services (even on different servers), this is not an issue. With the DDNS hostname that is linked to your external IP, you will reach your router. The router has to forward the request to the actual target.
Examples:
yourDS.synology.me(:8080)                - Webserver via http
https://yourDS.synology.me               - Webserver via https
http(s)://yourDS.synology.me/Nextcloud   - Nextcloud
http(s)://yourDS.synology.me/photo       - PhotoStation
https://yourDS.synology.me:5001          - DSM
http(s)://yourDS.synology.me/blog        - DS Blog, your homepage, any other website
yourDS.synology.me:<Port>                - Service provided by any other device in your LAN
If you want to use different sub domains or virtual hosts, you need another DDNS provider/a provider that offers several sub domains. If you don’t have your own domain, you could use different DDNS sub domains. DiskStation and some router offer access to certain provider. Some router and the DS allow to extend the list.
How DDNS works
DNS maps a domain to a certain IP. If someone wants to visit the domain, a DNS server tells you which IP address should be used for the network communication. But those DNS entries are static. If you get a new IP address assigned every day, the DNS will not work. Sure you could update the DNS entry ever day but that is dumb and will not work if your host should be reachable at anytime. DDNS solves this by offering an update mechanism who does the work for you. The downside of this is, that you need a client that tells the DDNS entry the new IP address. The client has to run within your LAN. You can install a DDNS client on your PC/a raspberry but the device has to be up and running to do its job. Gladly, router and DiskStations have already such a client.
Pick the solution that fits you
Now you have to check several things. It is better to have DDNS configured on your router (the router knows when the external IP changes). Otherwise you have to use the DiskStation, this usually works fine.* Check which providers are offered by your router, if none of the preinstalled fits, check if you can add your own, otherwise use the DiskStation.
I use the Synology DDNS but also used spDyn (for free) for some time and tried others as well. If you look for a provider, not in the list, check if it offers an update mechanism for your device (router or DiskStation). Also update tokens/separate credentials should be offered. The separate login or the token is linked to exactly one sub domain and can only be used for updating the IP. You can’t log in with them into your DDNS account. This increases the security. Add a new entry to your DDNS account (Synology DDNS does that automatically). Generate a token or credentials. The detailed setup differs from one provider to another, check the documentation or FAQ but mostly it is self explaining and easy to setup.

* My DiskStation shuts down during the night. Sometimes I have issues that the IP doesn’t get updated. It seems that a network issues prevents a connection with the internet/the DDNS provider to update the IP. I don’t know why the DS doesn’t do a retry or where the network issue comes from. I reduced the occurrence by changing the time when the DS boots up in the morning.
DiskStation configuration
DDNS
Use the DiskStation as update client if your router doesn’t offer a suitable provider and you can’t add one.
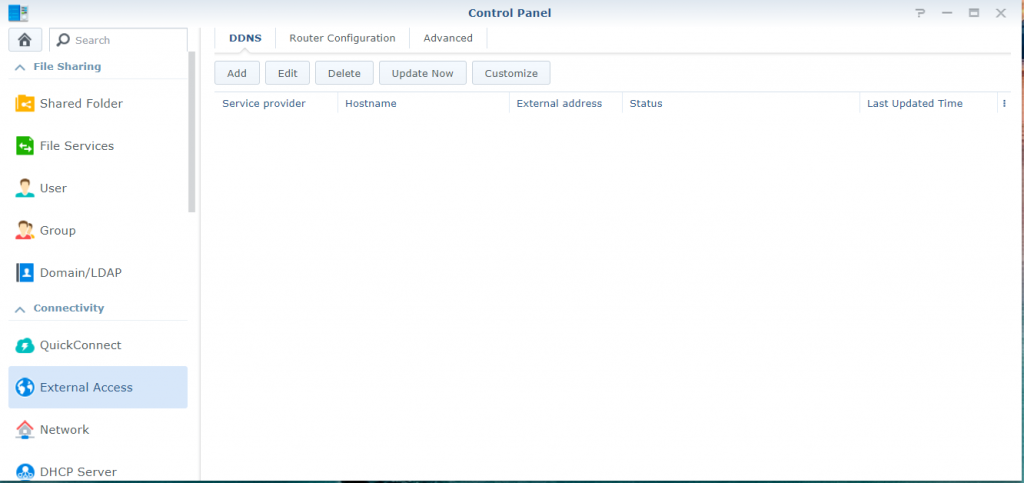
- Open the Control Panel.
- Go to External Access.
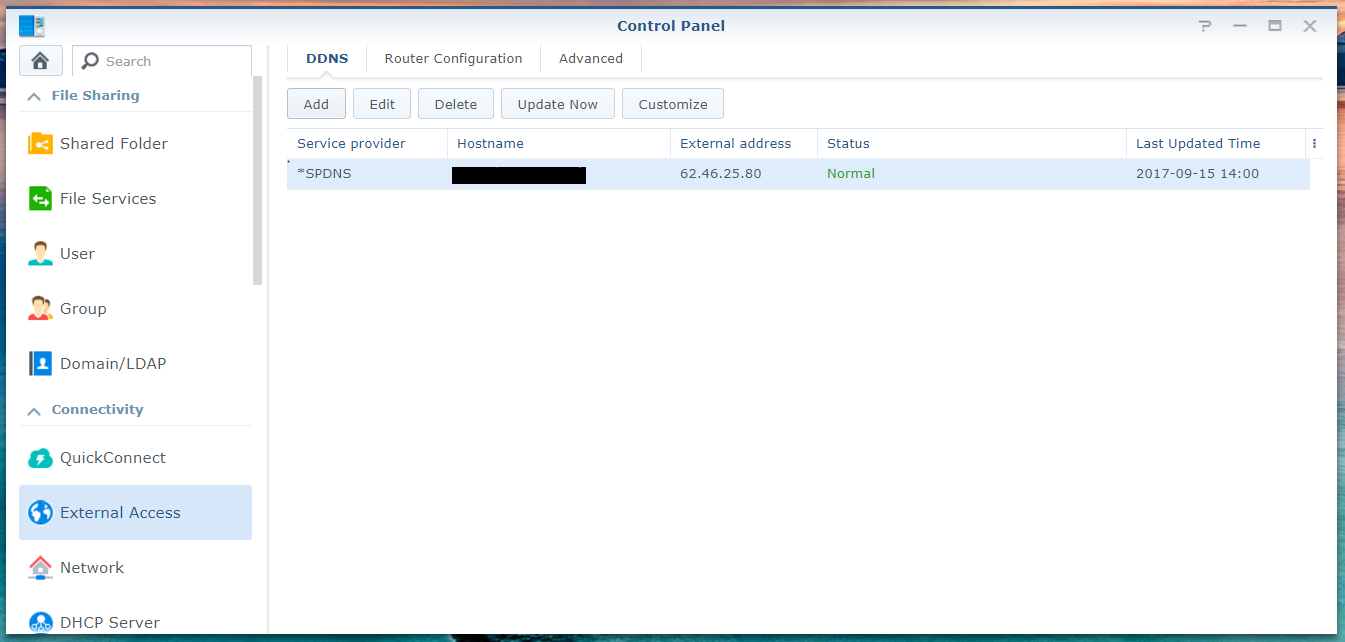
- In the DDNS tab click “Add”, if your provider is available continue at step 7.
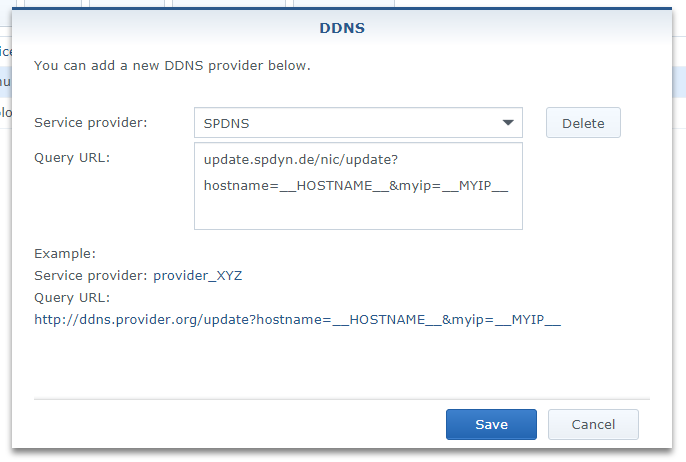
DDNS Management - If you can’t find your provider, close the window and click “Customize”.
- Enter a name and enter the update URL. The URL has to be provided by your DDNS provider and can look differently. __HOSTNAME__ and __MYIP__ are variables provided by the DiskStation, you only have these two, so not every URL is compatible. Keep in mind that the __ are two _ without space in between.
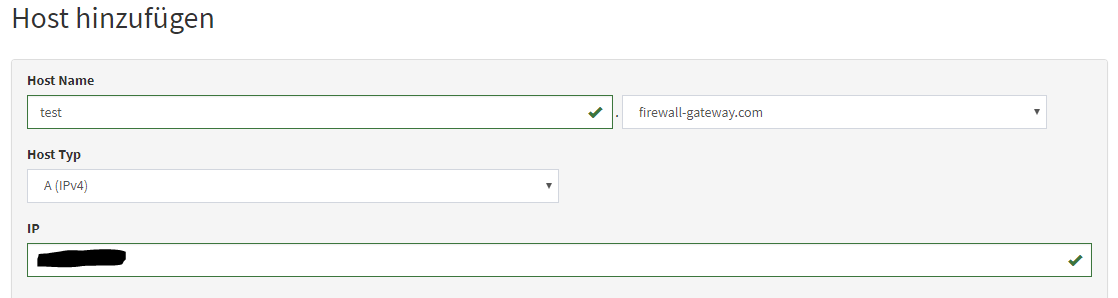
add additional DDNS providers - Save and go to the add entry window again.
- Select your provider and fill out the required data. Hostname is the DDNS sub domain. Replace the password with the token, if you have one.
- The DiskStation tells you if the update works or if it failed.

successfully configured DDNS

NAT/Port forwarding
More network trickery is needed to get things done. NAT (network address translation) is done on the router. It checks if an external request needs to be redirected to a certain host in the LAN. The DiskStation offers a menu for this, that sends the entries directly to your router (if it is compatible).Otherwise you have to directly configure it on your router.
Hint: Even if your router gets supported, take a look into the router config and check if everything is there. My router is compatible and the entries got transferred but added in the wrong sub menu (UPnP instead of NAT).
I recommend to just open the ports that you really need. Every open port is a security risk. So for any web server related, use only port 443 (https) and not 80. Details can be found in the chapter below.
Router configuration
Many internet provider hand out router/modem combo devices. Those often have limited configuration options. It is better to have your own router that connects to the internet (directly or via modem). The devices that you can use may vary depending on your internet provider. If you are not able to do the following configuration on your devices and you can’t replace the devices, you can us a DMZ and/or double NAT. This option is a bit complicated and slow. You have to research this on your own, as I don’t have experience with it.
So the following steps require, that you are able to configure your router. I can’t give detailed explanations, as the steps may vary on the device you use.
DHCP – static IP
This is not about a static external IP, it is about static internal IPs. To make external configuration – and most of the internal configuration, that you can find in other articles in my blog – work, you have to ensure, that your server/DiskStation always has the same internal IP (e.g. 192.168.x.x or 10.0.0.x). Many router are configured to provide IPs dynamically and temporarily. Go to the DHCP settings in your router config. Here, you have to add the MAC address of your DiskStation and assign it an internal IP.
DDNS
If your router offers DDNS and has your provider in its list (or is able to add new providers) do it here. Otherwise do it on your DiskStation as described above. I can’t explain how to, as it is different on each brand/firmware and mine doesn’t offer it anyway.
NAT/Port forwarding
The entries that you have to create are the same, no matter if you configure it on your DiskStation or your router.
- Go to the corresponding menu of your router.
- Add a new entry.
- If you forward requests from an external IP to an internal IP with the same port number, it is called NAT. If you forward the request to a different port number, it is called port forwarding. For our needs, simple NAT is enough. Enter 443 (https) as external port/service port (or how ever it is called in your firmware). The internal port is also 443 and the IP is the IP of your DiskStation im LAN (internal static IP you assigned).
- Create an entry for port 80 to port 80 as well, this one is used for testing purpose only and should be removed afterwards if you don’t explicitly need it.
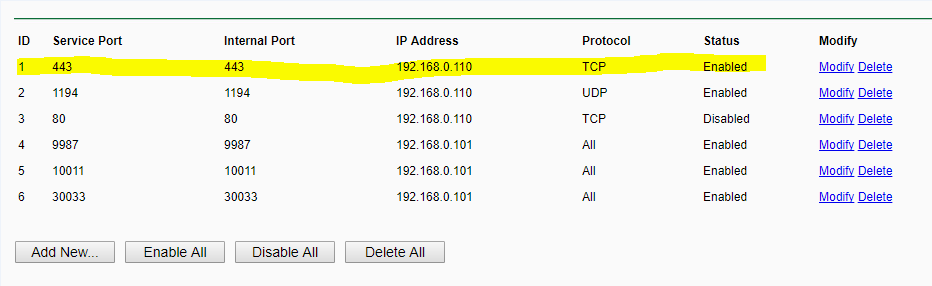
NAT (Network Address Translation)
To use https instead of http, you need an SSL certificate, how to get one, is explained below. You can see an entry for port 80 in the picture, but it is deactivated. Why it is there, you will also read in the SSL part of this tutorial. The port 1194 is used for OpenVPN which is not part of this tutorial. The other ports are for TeamSpeak, that I just tried out but never actually used. As you can see, the IP address is not the address of my DiskStation. The TS server was running on a different computer. This can be done with a single DDNS domain.
Check now if you can reach your web server. We use http for now as we haven’t covered SSL certificates yet. Enter your DDNS domain in your browser (use a smart phone or any other device that has internet access but is not connected to your LAN). You should see the blue dummy page of your Web Station (if you haven’t changed the index.php in the /web folder).
Nextcloud
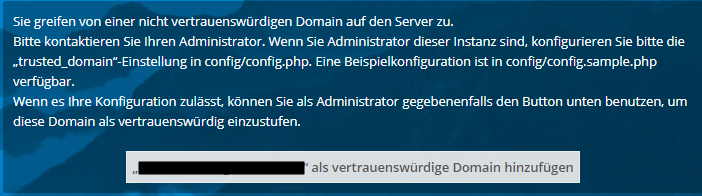
To access your Nextcloud, enter http://your.ddns.com/<NextcloudFolder>.
Nextcloud will most probably tell you, that you are accessing it via an untrusted domain. You can add the domain as trusted domain, either directly in the Nextcloud config file or by clicking the button. You have to log in with an user with admin privileges to make this happen.
That’s basically it you can access your Nextcloud/webserver via internet, but we want to use secure https so continue reading. I will also explain how to use your own domain and how to create a vhost on your DiskStation.
https encryption/SSL certificate
With an open port 443 you can reach Nextcloud (and all other services) via https. But the traffic isn’t encrypted yet. Your browser will show you an error message. You need an SSL certificate in order to secure the traffic and actually make https possible.
In DSM you are able to configure SSL certificates. You have several options, you can either use a self generated certificate, add a certificate from external providers or create a Let’s Encrypt certificate. The self signed certificate is enough for your own purpose and it’s easy to generate and lasts quite a long time. But the browser will show a warning first, you can still visit the page, and the page is secure, but many inexperienced users will not get past the warning (you have to expand the message and hit “continue to unsecured page”). Also many tools and apps do not allow self signed certificates. Some people only use self signed certificates because there are rumors that NSA has access to certification authorities, that means, they are able to bypass SSL certificates, signed by those CAs. Let’s Encrypt certificates are easy to get, for free and trusted, so no issues with browsers or apps. Disadvantage: You have to renew the certificate every 90 days.
Let’s Encrypt certificate
- To be able to request a certificate, your DiskStation must be reachable via port 80. Remember what I said? Do not open port 80 if it isn’t necessary. And you saw that it is still in my NAT list but disabled? I open port 80 only for the certificate request and close it afterwards. Renewing the certificate also requires port 80, that’s why I keep it in the list but disable it.
- Open the Control Panel.
- Go to Security.
- Go to Certificates tab.
- Click the “Add” button.
- Choose “add new certificate”.
- Choose “Let’s Encrypt certificate”.
- Settings:
- Enter the domain name the certificate is used for. You could create separate certificates for each service or you create one certificate for several domains. You can choose which service uses which certificate, also each vhost can have its own certificate**.
- Enter an email address.
- Alternative domains: here you can add additional domains that should use the certificate. Don’t forget the add the original domain as well (it will work without but to pass high SSL standards, you have to have it also here). IPs are not allowed, neither external nor internal, also the DiskStation alias is not working.***
- Send the request. It will take a bit. Unfortunately, the error message is not very helpful. There are 2 main reasons for an error:
- Either your DiskStation is not reachable via port 80 or
- the certificate can’t be generated for one or more of the domains, e.g. 127.0.0.1 is not allowed. Wildcards are also not allowed yet.
Let’s Encrypt limits the number of certificates per top level domain, so it’s hard to get a certificate for DDNS sub domains or hoster sub domains. If you don’t have an own domain, try it out, synology.me doesn’t work anymore. Some DDNS provider (e.g. spDyn) offer different domains, you can choose from. Eventually one of those is working. If this doesn’t work and you don’t get your own domain, you have to generate a self signed certificate.
** There are some limitations. E.g. it isn’t possible to configure the Photo Station as vhost. So the Photo Station always uses the default certificate. Also Nextcloud has its issue here. You can create a vhost and access via browser works fine, but the Desktop Client seems to get the default certificate. So using one certificate as default one and a second certificate for the vhost doesn’t work.
***This does not apply to self signed certificates.
Setup your own domain
If you want to use your own domain, go to the DNS settings of your domain administration. You have to add a CNAME entry. Your (sub) domain refers to the DDNS domain.

Usually you have to wait a few minutes up to some hours until the new DNS entries got propagated and are usable. Try to enter your domain into the browser (keep in mind, use your smart phone, to make it work in your LAN, read here).
Now you could access your server with your own domain. You can let more than one sub domain point to your DDNS domain. This helps especially when you want to use vhosts. Keep in mind that all sub domains will lead to your router, you can’t add a protocol (http, https, ftp, …) or a specific port number here. The router decides, based on the port number, where to forward the request. So as long as you do not enter any protocol or port number, you will end up on port 80. You have to add https:// when you enter the domain in your browser or anywhere else. If you want to reach a certain service, you have to add the port number.
If you want to limit your sub domain to a certain website/service, you have to work with .htaccess, vhosts and other techniques to achieve that.
Nextcloud
Enter this domain as trusted domain as well.
vhost configuration (optional)
This is optional. By default, all domains + port 80 or 443 end up in the web servers document root. On your DiskStation the root is the shared folder /web. To get into a subfolder, you use yourdomain.com/subfolder. If you want to access a subfolder with a certain (sub) domain you can either use redirect rules in .htaccess, or you create a vhost. The vhost also allows to use a certain web server and PHP profile.
- Open the Web Station (in DSM).
- Go to virtual host.
- Click “Add”.
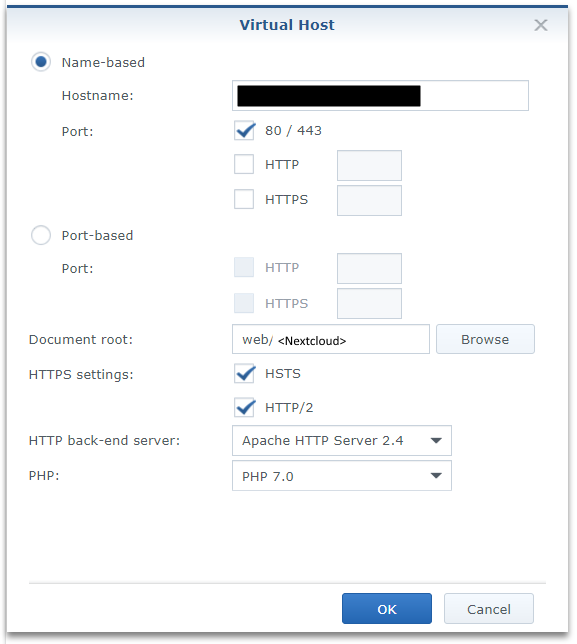
- Enter a hostname that points to your DiskStation.
- Activate port 80/443.
- As document root, choose the installation folder of Nextcloud or any other sub folder you want to reach with the domain.
- Activate HSTS and HTTP/2.
- Choose the web server and PHP profile you want to use. I use Apache 2.4 and PHP 7.0, it can be changed at any time.
Now you reach your Nextcloud or web site directly with the entered domain. But don’t forget, if you want to reach any other service/site, you have to configure an additional (sub) domain to point to your DiskStation. You can configure a an additional (sub) domain pointing to your DDNS domain, you don’t have to configure a second DDNS domain.
Name resolution within your LAN (optional)
Until now, we used our smart phone to test everything. The domains will not work from computers within your LAN. If you want to reach a domain, you computer asks a DNS server which IP is behind that domain. The DNS server is provided by your router and is usually a DNS server from your internet provider. You can also configure other DNS servers. So for you domain you will get the external IP of your router. But actually you need the internal IP of your DiskStation.
To solve that issue, you need your own DNS server that gives back the correct IP for devices in your LAN. Luckily there is a DNS server package for your DiskStation.
- Download and install the DNS server via Package Center.
- Open the DNS server.
- Create a new Master zone.
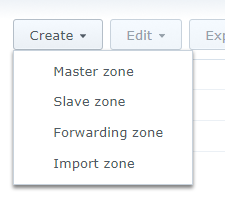
new Zone entry - Choose type “Forward Zone” enter the domain (e.g. yourDS.synology.me, yourdomain.com). The other settings you can copy from the screenshot.
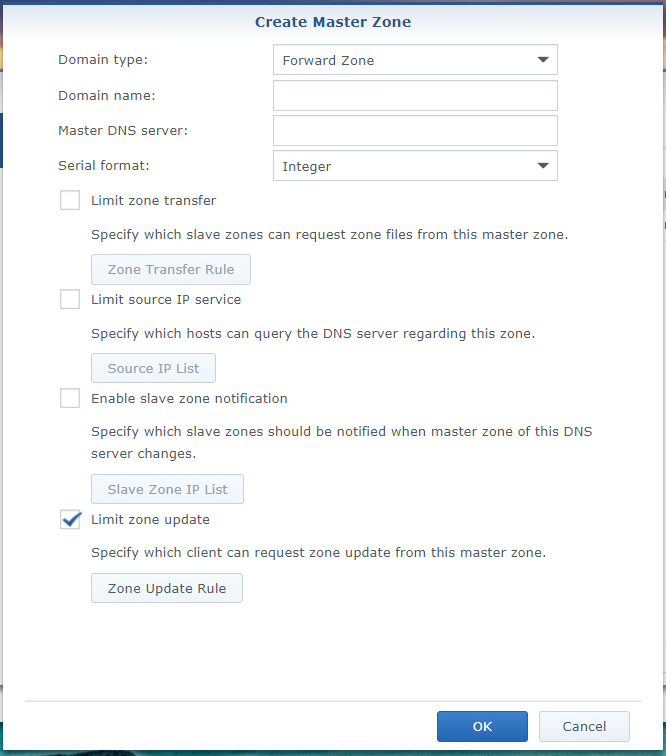
Forward Zone - Click on the new entry and open Edit -> Resource Record. Complete the list with the entries from the screenshot. Instead of 192.168.0.110 use the IP of your DiskStation.
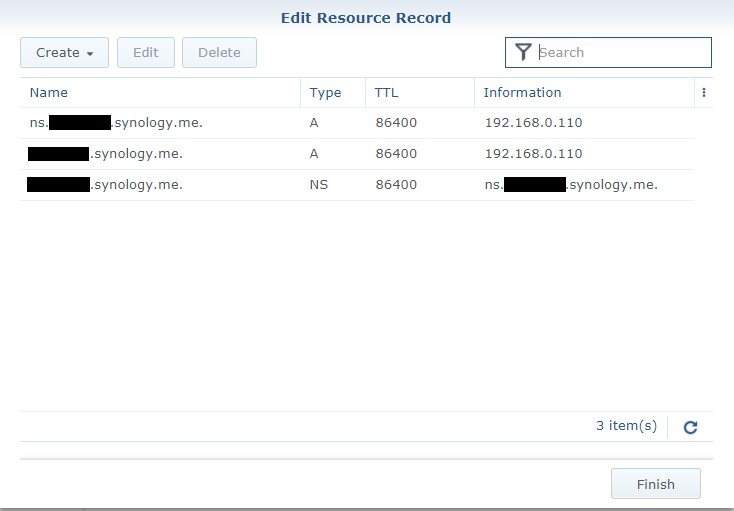
Resource records - Now go to Edit -> SOA Record. The settings should look like in the screenshot.
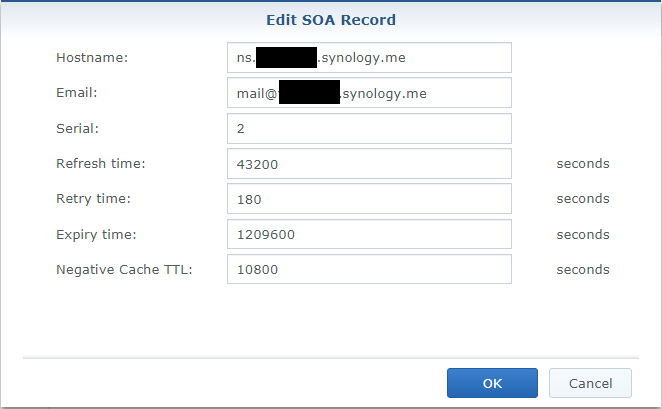
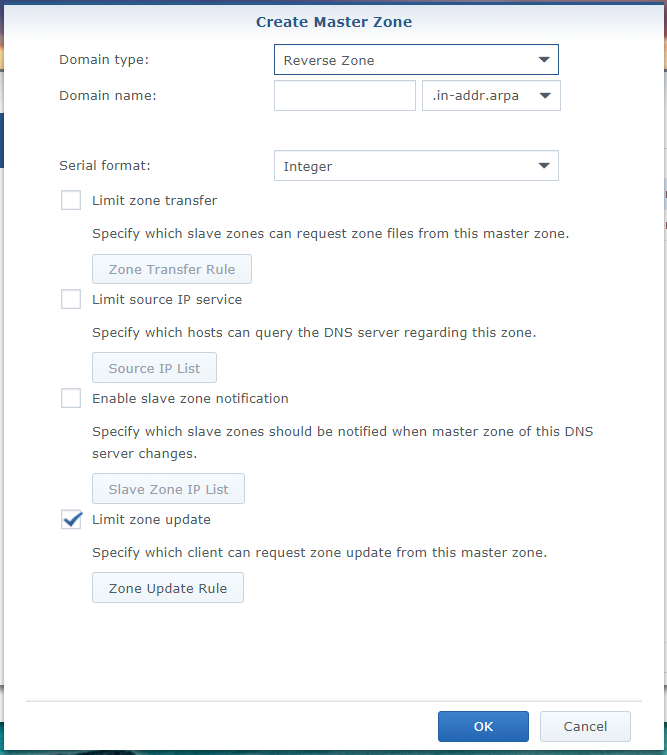
SOA record - Create a second Mater zone but this time choose “Reverse Zone”. As domain enter the local IP net, you need only the first 3 segments and the order has to be back to front. (e.g.: your local net is 192.168.0.0 –> enter 0.168.192, if our local net address is 10.0.0.0 –> enter 0.0.10).
Reverse Zone - Edit the resource records and for the two PTR records enter the local IP of your DiskStation backwards.
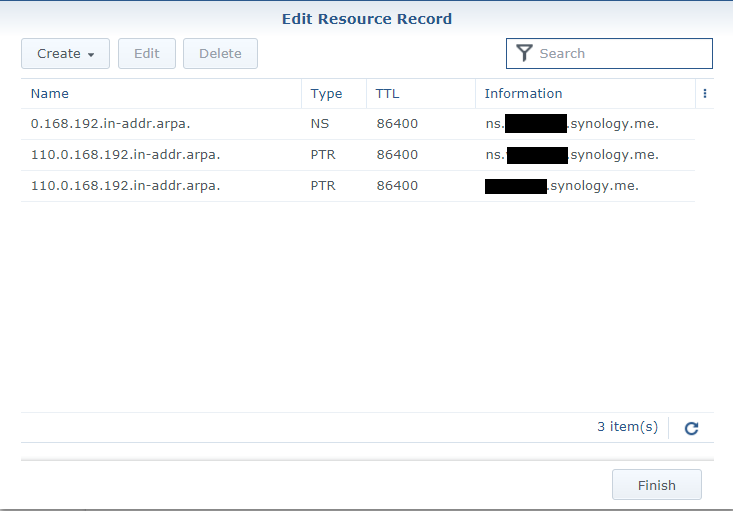
Resource records of the reverse zone - The SOA records should look like following:

SOA records of the reverse zone - The configuration is done. Now you have to tell your hosts which DNS server they should ask. Open the router settings and go to DHCP settings. You should be able to enter several DNS servers, those get delivered to to hosts together with their IP address. As first server, you enter the local IP of your DiskStation, as second server, enter the gateway IP of your router. The gateway ip is the local IP of your router, it is usually the IP with .1 as last segment. It’s the same IP that you use to open the router settings in your browser. So first your hosts are asking your DiskStation to resolve the domain name, if the DiskStation doesn’t know the host, the router is asked, which forwards the request to the ISP DNS. Instead of the router gateway IP you can also enter the IP of any available DNS server. Now open the command line of your PC and enter ipconfig /flushdns, you will now get the new configuration from your router. Now you should be able to use your domain to reach your DS also internally.
If you have issues (e.g. you are not able to reach other websites), stop the DNS server on your DiskStation or remove the DS IP from the routers DHCP settings. Enter ipconfig /flushdns in your command line again. Now you can use the internet for trouble shooting again. Eventually the gateway IP doesn’t work and you have to enter an actual DNS server IP.
I hope the setup is working now as you wanted. There are many points of failure and often you have to research on your own or get help in a forum (the Synology forums are a good place to ask for help). You can also leave a comment, unfortunately, the time I was familiar with network technologies are long gone and my knowledge is limited.
Also I’m not a network security specialist. That’s a topic for its own anyway. I recommend you to do some research on your own. Don’t skip that topic but also don’t get to paranoid. You have done the basics with limiting the open ports and using https. Try out if everything works and be sure, that only the things that should be reachable are reachable. Check if you can reach services that should not be reachable from the outside, check if http is working or not. Keep in mind, that some services share the same port, e.g. DSM and the Video Station use 5000 (http) and 5001 (https) by default, those you can change in the App Portal. The DiskStation has its own Firewall, that I will handle in a separate post.