
In this post, I’ll show you how to use Nextcloud to sync/backup your pictures but still use the Photo Station to view them. There are different reasons for using Nextcloud instead of the Cloud Station. Nextcloud has all the features I need in one package and a great web interface, also the Clients are better and the compatibility with third party software and services is better.
Solutions
Syncing your pictures with Nextcloud isn’t a big deal. But getting them into the Photo Station is a bit tricky. Other than the Video Station, the Photo Station doesn’t allow to add random folders. Only pictures located in /photo are shown. Older versions of Photo Station made it even more complex. When you add pictures, the Photo Station creates thumbnails and indices. This didn’t work if you added them the wrong way. Removing pictures was even worse (thumbnails didn’t get deleted which lead to ghost pictures in the Photo Station). In the past few years, I tried different solutions including redundant data and large scripts doing the job. Gladly the Photo Station isn’t that picky anymore.
\photo as external storage in Nextcloud
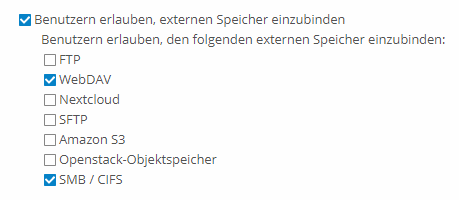
Nextcloud allows to add storage from external sources and services. This comes quite handy in our case. Even the same server (DiskStation) can be treated as external storage, it just needs one of the supported interfaces. From the list of interfaces, the DiskStation offers SMB and WebDAV. Unfortunately Nextcloud can handle only SMB on Windows servers, so WebDAV is the only service left.
Setup
-
- If you already sync your pictures with Nextcloud, delete the sync task and delete the folder on the cloud side. Be sure to have some backup of your pictures. Don’t work with live data until everything works how it is intended.
- Log in to DSM/DiskStation web interface as an admin/user with admin privileges.
- Install the package WebDAV Server via Package Center.
- Open WebDAV Server and ensure that sharing is enabled.
- Log in to the Nextcloud web interface (admin privileges are required again).
- Install the module External Storage from Apps menu.
- Go to Settings, there you shuold find External Storage two times, once in your personal settings and once in the server settings*. Open the one in server settings.
* Depends on the Nextcloud version, they reorganize options from time to time. - Here you can set up external storage, either for all users, or only certain users or user groups. ****
- Enter a folder name, this one is shown in Nextcloud and can be any name.
- Choose WebDAV from the drop down. Further options will appear.
- As authentication choose username and password.
- As URL** enter “http://127.0.0.1:5005” if Nextcloud is running on your DiskStation. Only localhost worked for me, the LAN-IP 192.168.X.X or the DiskStation alias didn’t work. It is also important to not forget the port number.
- As remote subfolder enter “photo” , without “\”. If you want to use just a subfolder within \photo, enter it like this: “photo\Subfolder”.
- Now just enter the user credentials for a user of the DiksStation***.
- Shares entered in the server settings are available for every NC user. You can limit the access with the option available for. Just enter user names or user groups that should see the external storage folder.
- Confirm the settings with clicking the tick.
- Now a loading icon appears next to the folder name. It should turn into a green circle after a short time. If so, everything worked fine and you can use your external storage folder.
- If it turns into a red square, something went wrong. Check the NC log for the error message, this usually helps a lot to tracing down the error.
- Depending on the file size of your linked folder, it takes some time until NC parsed all files and displays them in the webinterface.
- Now you can add a sync task on your Nextcloud client again.

Error: File is locked
The solution is not perfect. It is very likely that you will get errors during sync processes. The error message is: “File cannot be synchronized, Server replied: File is locked”. The issue lies in the file locking. Usually, a file gets locked when it is uploaded so it can’t be changed by others during that time. Or it gets locked while it is saved to the HD so that it will not be uploaded during that time. I had this issue somethime also with normal storage. But with external storage it happens almost every time. It usually happens when files are opened in software that update them regularly (e.g. pictures opened in Lightroom, or similar software). Those files get altered and saved regularly, this seems to break the file locking. The file is marked as “locked” in the database and doesn’t get unlocked. For a quick fix, you can deactivate locking. That shouldn’t be too critical as long as you don’t work on shared files, that others could also work on.
To disable locking, add “‘filelocking.enabled’ => false,” (without ” but with ‘) to the config file of Nextcloud (config.php). WARNING: Edit the config only via command line (putty). If you use the text editor from DSM, the ownership gets altered and Nextcloud can’t read the file anymore.
Now you have to unlock the files. Therefore you have to log in to PHPMyAdmin or access the database directly via command line. Delete all entries in the lock table: DELETE FROM oc_file_locks WHERE 1
There is a better solution but it may not work on every DiskStation. Nextcloud recommends to use redis for file locking. It has a better performance than the default locking system but it is not available on every system. A while ago you had to compile redis on your own, which was only possible forPHP 5.6 (or at least there was no info on how to do it for 7.0). Now the redis modules are part of the Synology PHP package. You just have to install the server part of redis.
- Install the redis package from the Community in package center.
- To get redis to run, you have to alter the start/stop script /var/packages/redis/scripts/start-stop-status
start_daemon () { setuid redis exec /usr/local/redis/bin/redis-server /usr/local/redis/var/redis.conf } - Now you can start redis.
- Create the file /usr/local/etc/php70/conf.d/user-settings.ini if it does not exist yet. There you have to enter the open_basedir and the modules that you want to enable, including redis. Mine looks like this:
open_basedir = /tmp:/var/services/tmp:/var/services/web:/var/services/homes:/volume1/Nextcloud:/dev/urandom

zend_extension = opcache.so
zend_extension = xdebug.so

extension = apcu.so
extension = bcmath.so
extension = bz2.so
extension = calendar.so
extension = curl.so
extension = dba.so
extension = exif.so
extension = ftp.so
extension = gd.so
extension = gettext.so
extension = gmp.so
extension = iconv.so
extension = imap.so
extension = intl.so
extension = ldap.so
extension = mailparse.so
extension = mcrypt.so
extension = memcached.so
extension = mysqli.so
extension = openssl.so
extension = pdo_dblib.so
extension = pdo_mysql.so
extension = pdo_pgsql.so
extension = pdo_sqlite.so
extension = pgsql.so
extension = phar.so
extension = posix.so
extension = redis.so
extension = shmop.so
extension = soap.so
extension = sockets.so
extension = sqlite3.so
extension = ssh2.so
extension = sysvmsg.so
extension = sysvsem.so
extension = sysvshm.so
extension = wddx.so
extension = xmlrpc.so
extension = xsl.so
extension = zip.so
- Now you can enable file locking again and use redis. Add following lines to you Nextcloud config:
 'filelocking.enabled' => true,
  'memcache.locking' => '\\OC\\Memcache\\Redis',
  'redis' =>
  array (
    'host' => 'localhost',
    'port' => 6379,
    'timeout' => 0,
    'password' => '',
    'dbindex' => 0,
  ),
To check, if everything is ok, go to the settings in the Nextcloud web interface. If file locking is enabled correctly, you will see no error message.
Notes
**https: If nextcloud and exernal storage are not located on the same server, you should definitely use https. Activate secure https at the external storage configuration and change the port number from 5005 to 5006. If both services run on the same system, http is ok. In this case, https doesn’t work anyway as you can’t add 127.0.0.1 to the SSL certificate.
***Dedicated WebDAV user: To not enable your own DS user (who most likely has a lot of privileges) in the external storage config, just create a new user on your DiskStation. This one has only access to WebDAV Server and write permissons on \photo, furthermore it needs permissions for the Photo Station (those are directly assigned in Photo Station and not in DSM). Unfortunately, the user has to be part of the admin group. A user from the user group is somehow not able to create the files in \photo when you upload them via Nextcloud.
****External storage per user: You can also set up the external storage on a per user base. Therefore the setting allow users to add external storage and WebDAV. After that, every users has the external storage option in his settings. Those storage is only seen by the user. Downside: If you enable this option, every user is able to add external storage.
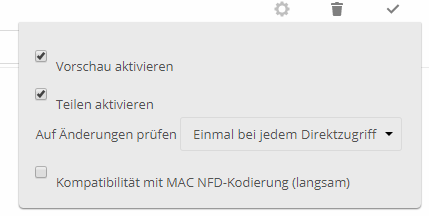
Sharing: To be able to share files and folders from external storage, sharing must be enabled manually. In the external storage settings, click the gear icon at the external storage entry. Activate enable sharing (Teilen aktivieren, the second option, sorr for the German images). Now you can share external files and folders like the normal ones.
Setup done
If everything is working fine, following steps should work:
- Upload files through Nextcloud web interface –> Files show up in Photo Station and thumbnails get generated
- Sync files via Nextcloud (desktop) app –> Files get uploaded (or synced) to \photo, thumbnails get generated
- Place files directly in \photo –> works, Nextcloud observes external storage for changes
- Change files in Photo Station (e.g. add tags) –> Changes get added to Nextcloud and synced, but Nextcloud does not generate an entry in version control for that changes
- Delete files (Nextcloud) –> Files get removed from Photo Station, also thumbnails get removed, works also the other way round
- Move files (Nextcloud) –> Files and thumbnails get moved, works also the other way round
It seems that Nextcloud and Synology improved their software and they are working together bettern than before. I tried external storage some years ago (with Owncloud) and it didn’t work at all. Files didn’t get indexed correctly, access permissions were wrong, pictures couldn’t be opened and thumbnails also weren’t created.
I tried other solutions via sync scripts but files didn’t get deleted and moved correctly. Indexing and thumbnail generation had to be redone after each sync etc.
That is just perfect. Thank you very much for sharing your experience and knowledge. I can tell you it’s far from useless.